Unity Toy Path Tracer

On July 1st 2019, I started reading and implementing Peter Shirley’s Ray Tracing in One Weekend minibook in C# as a Unity project.

GitHub Project : https://github.com/renaudbedard/raytracing-in-one-weekend

I ended up working through the second and third minibooks as well, and had a blast doing so! So I want to write about what I consider makes my implementation a little bit different, features I added that aren’t present in the books, and generally document the process.

Inspirations and references

What got me started on this project is likely the inescapable buzz of ray-tracing hype on Twitter, but there were other precursors.

I think the first thing that made me want to give it a shot was Aras Pranckevičius’s Daily Pathtracer series, in which he goes in depth about performance and rendering accuracy. I kept referring back to it as I built my version, it’s a goldmine of information.

Peter Shirley’s twitter account is also full of retweets from other people trying their hand at making their first ray-tracer using his books, and I love how this created a community of people rendering… the same exact images as each other! It was motivating and inspiring to watch other people hit milestones in their path tracer, and see in which direction they diverged from the source material.

Runtime Data Setup

I decided to implement my path tracer in C#, inside a Unity project. There’s a few reasons for this :

  • I wanted to further explore the DOTS stack, and especially the Burst compiler and the Job system, and see how much performance it could bring to the table
  • Having the scene description and other parameters as Unity objects allows me to tweak them easily through the Inspector window

So the whole renderer is built into a massive C# job, AccumulateJob. It can be thought of as a CPU pixel shader that for each output pixel, takes the scene information, shoots a ray, scatters it around and computes the final color value.

There are a few design considerations that using “high-performance C#” (the flavor of C# that Burst compiles) brings to the table, most notably that classes, virtual calls and dynamic allocations are forbidden. The original books used inheritance to implement many of its features (e.g. the hittable base class), so I found ways to work around this.

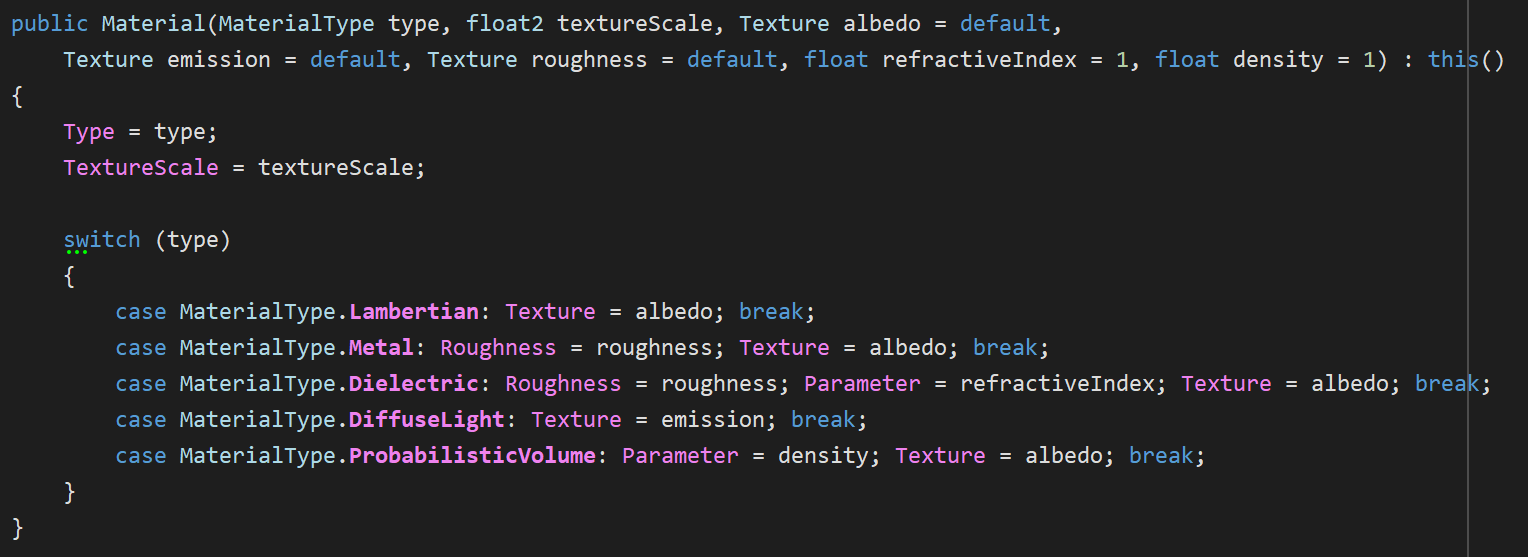
My Material struct is sort of an uber-material that uses an enum to branch out to different code paths depending how it’s been set up.

Likewise, Texture can represent all texture types that I support, including images, checker patterns and Perlin noise.

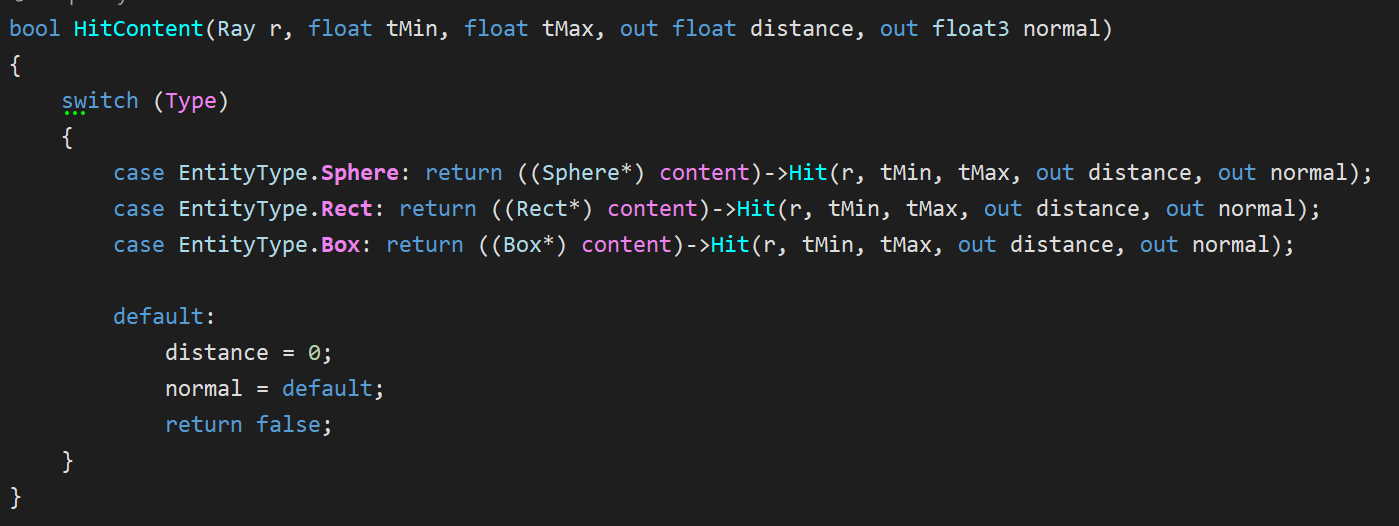
My Entity struct is also backed by an enum, but to split the code a little, I branch out to a content pointer that is represented by another struct. This indirection for sure hurts performance and cache locality, but I liked the extensibility of this design.

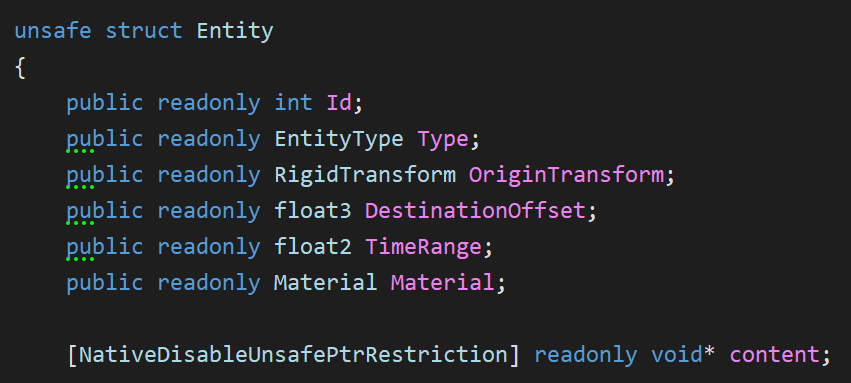
Note that I don’t have a concept of instances; instead, my Entity wrapper contains a translation and rotation and the entity’s hit function inverse-transforms the ray into entity-space before performing intersection tests.

BVH Improvements

A chapter of the 2nd book is dedicated to Bounding Volume Hierarchies, one way to spatially partition the scene to avoid intersection tests that aren’t relevant for a given ray. The technique works well, but the way that the BVH is built and used in the book was advertised as the simplest way to do it, which felt suboptimal, so I took a stab at making a better version.

Better BVH Partitioning Heuristic

Whereas the book’s version partitions nodes along a random axis every time (as long the node contains more than one hittable), my version always partitions along the axis in which the node is the largest.

Also, the book’s algorithm sorts hittables according to the partition axis, then splits the entity list in half right in the middle. This way of doing it does not take into account the size of the entities, and can result in unbalanced nodes if their size has a lot of variance. My version takes into account entity size and attempts to split in the world-space middle of the node along the chosen partition axis.

Here’s a heat map of BVH node hits of the book’s algorithm (left) versus mine (right) in the first book’s final scene. This visualization (credit to mattz’s ShaderToy for the color ramp) is normalized such that the hottest color is the highest number of hits, but in my version, the number of hits is also reduced.

Optimized BVH Node Traversal & Testing

Another thing is how the BVH is traversed. The book hit-tests nodes recursively, which is easy to implement but has more overhead and is worse for cache locality. I changed the algorithm to an iterative version with a stack-allocated “stack” (actually just an array) which builds a list of candidate leaf nodes as it traverses the BVH.

And finally, the book’s AABB hit test for each BVH node can be optimized. I found a fast GLSL implementation by Roman Wiche that appears to be the state of the art, and precalculated the inverse ray direction to avoid needlessly reevaluating it if there is more than one AABB test for a given ray (which there usually is).

All of these changes have a noticeable effect on performance, with the iterative traversal having the biggest impact. Here’s a comparison of the different techniques, all in the same scene (482 entities, 963 BVH nodes).

No BVH0.34 MRays/s
Random axis, median hittable split, recursive2.64 MRays/s
Biggest axis, median hittable split, recursive3.06 MRays/s
Biggest axis, true center split, recursive5.95 MRays/s
Biggest axis, true center split, iterative11.7 MRays/s
Biggest axis, true center split, iterative
(optimized AABB hit test)
12.65 MRays/s

Job System

One of the first things I added to the project was the ability to do progressive or batched rendering. This allows me to set a high target for samples-per-pixel, but render several batches to get there, and display a preview of the current results when a batch is complete.

To achieve this, I use a chain of Unity jobs :

Accumulate (now renamed to SampleBatch) is the main job and performs the path tracing for a given batch size, which represents how many samples will be performed in this accumulation pass. The format of its output is a float4 where RGB is a sum of the color of all accumulated samples for that pixel, and A holds the sample count.

Combine does a few simple operations :

  • Divide the accumulated color by the sample count
  • Duplicate lines (when using interleaved rendering, which is detailed in the Added Rendering Features section)
  • In debug mode, mark pixels with no samples and NaN values as special colors

Denoise is an optional denoising step, which is detailed in its own section below.

Finalize converts the 96-bit HDR input to the 32-bit LDR output texture format and applies gamma correction. This is where tone-mapping would be performed as well, but I never got around to adding it.

Apart from the accumulation buffer and the output texture, no buffers are shared between jobs, so they can technically all run in parallel. To ensure this, I use a buffer pool for each required type, and a job queue that frees up used buffers as a job is completed. It’s tricky to show this system without taking a dozen screenshots, but take a look at the implementation for Raytracer.ScheduleCombine() for reference; it’s a relatively straightfoward use of this system.

Cancelling Jobs

Unity jobs are fire-and-forget, and there is no mechanism to cancel them. This is fine, because jobs are meant to terminate in at most 4 frames, but in my case, an accumulation batch or a denoising pass can take mutiple seconds, so I wanted a way to forcibly abort all active jobs.

To achieve this, I pass a NativeArray<bool> that contains a single element to all my long-running jobs. This is a cancellation token, which can be controlled externally and tested from within the job as it runs. From the job itself, it’s as simple as periodically testing whether the 0th element of that buffer is true, and earlying-out of the job if so.

Unity has systems in place to make sure you can’t modify a native buffer while it’s in use by a job, but there are ways around them…

It’s sketchy, but it definitely works!

Optimal Scheduling

In the first iteration of my job system, scheduling roughly worked like this :

While this worked, there are side-effects :

  • Unity’s update rate dictates how soon a new job can be scheduled after the preceding job completes. This means that even if jobs are instantaneous, there will be a delay before a new one gets scheduled.
  • Dependent jobs (e.g. a CombineJob following an AccumulateJob) will not naturally chain into each other, again introducing latency because of the manual polling from Update().

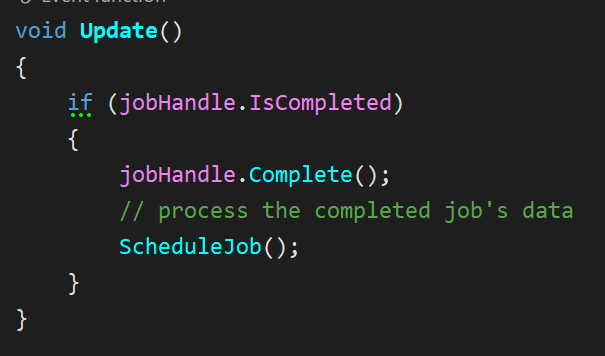
My current version still polls for job completion in the Update() callback for each job queue (JobHandle.Complete() must be called from the main thread, and this is where I return used buffers to the pools), but whenever an AccumulateJob is scheduled, it also schedules a CombineJob, a DenoiseJob (if applicable) and a FinalizeJob as dependencies of the accumulation pass.

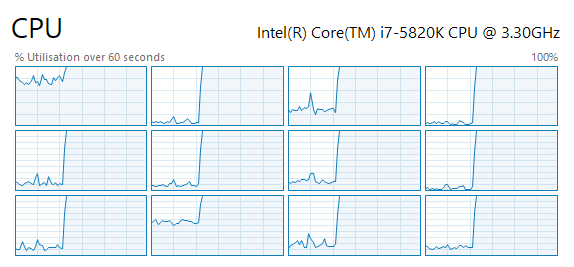
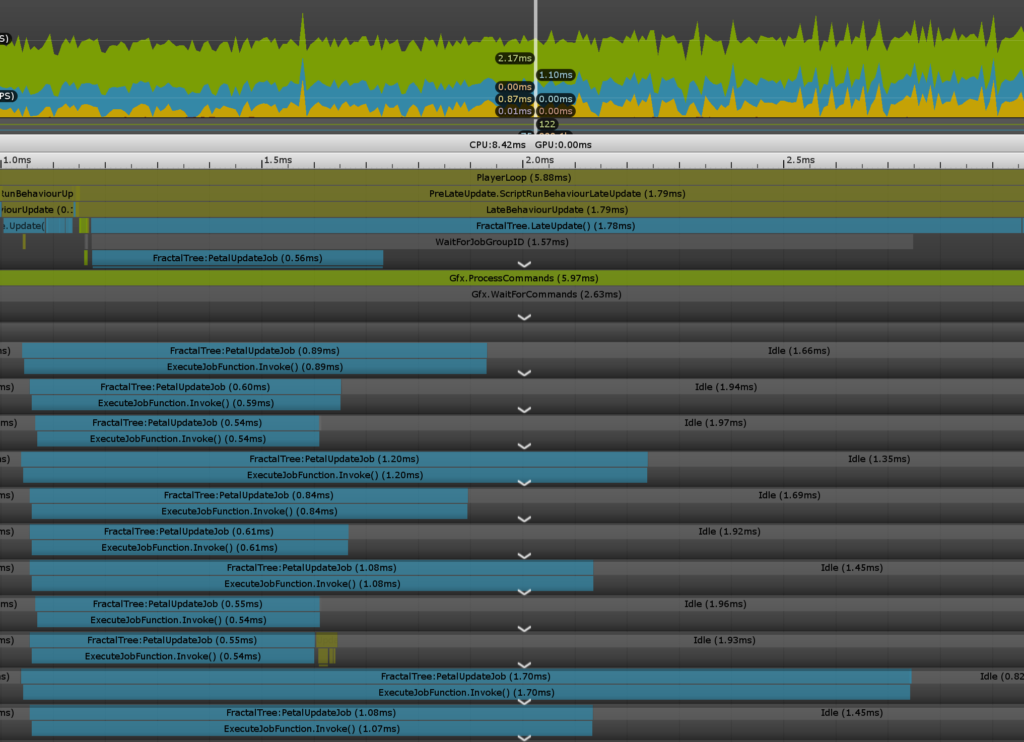
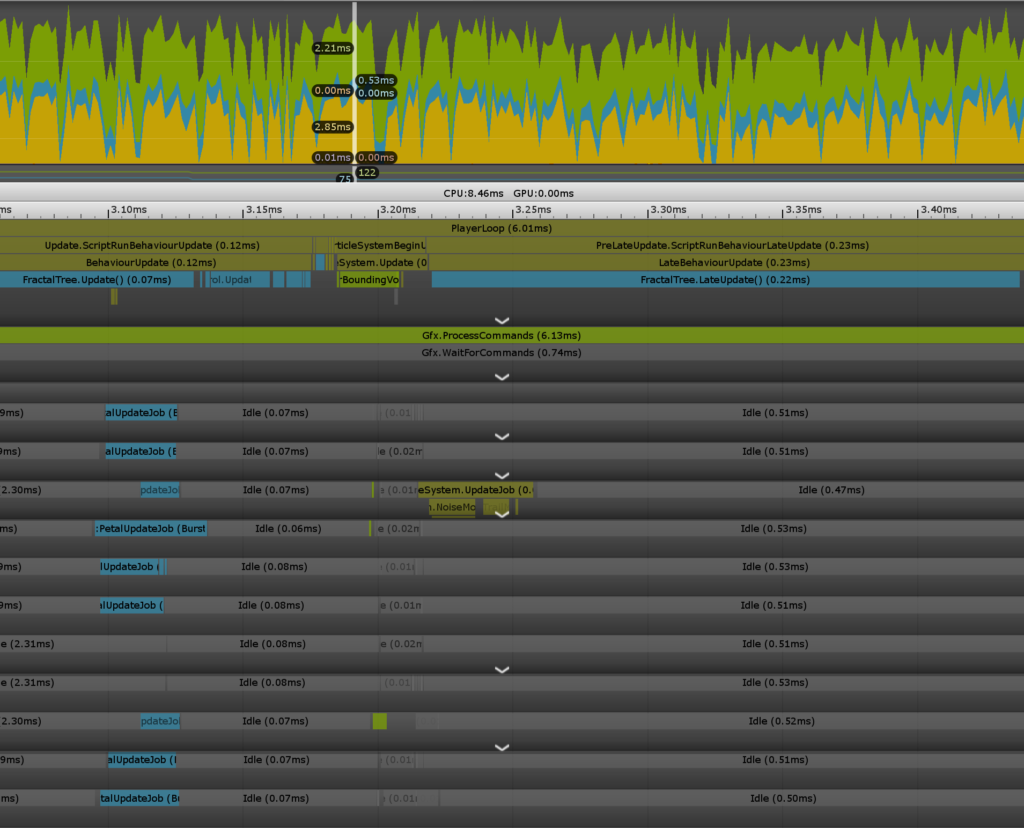
By passing the preceding job’s handle (or its combined dependencies) as a dependency to the next job and scheduling all at once, jobs naturally flow into each other, and idle time is eliminated. I also ensure that there is always at least one AccumulateJob waiting in the pipeline (as long as there are batches to trace), to ensure the system is never starved for work. The result of this is a fully pinned CPU on all 12 hardware threads!

Profiling Jobs

A common metric to test the performance of a path tracer is rays per second, usually counted in millions. This is more useful than milliseconds per frame because it’s resolution agnostic. It is, however, scene-specific : not all rays take the same amount of time to trace, and more complex scenes will make the performance appear to fluctuate wildly, so take it with a grain of salt. It’s obviously also hardware-specific, and the number for a given scene will increase on a faster system.

To obtain this number, it should be as simple as surrounding the path tracing code with a stopwatch, and counting the number of rays you’ve traced. Well, it would be simple, except that being in the Job System + Burst world makes it a bit trickier…

  • You can schedule jobs, but it’s not fully clear when a given job will start on a worker thread
  • I could not find a way to get a callback after a job is finished running
  • Stopwatch (the most common way in .NET do obtain a high-resolution timer) is a class, so you can’t use that in a Burst job

My solution is, again, a bit out of the ordinary, but it works :

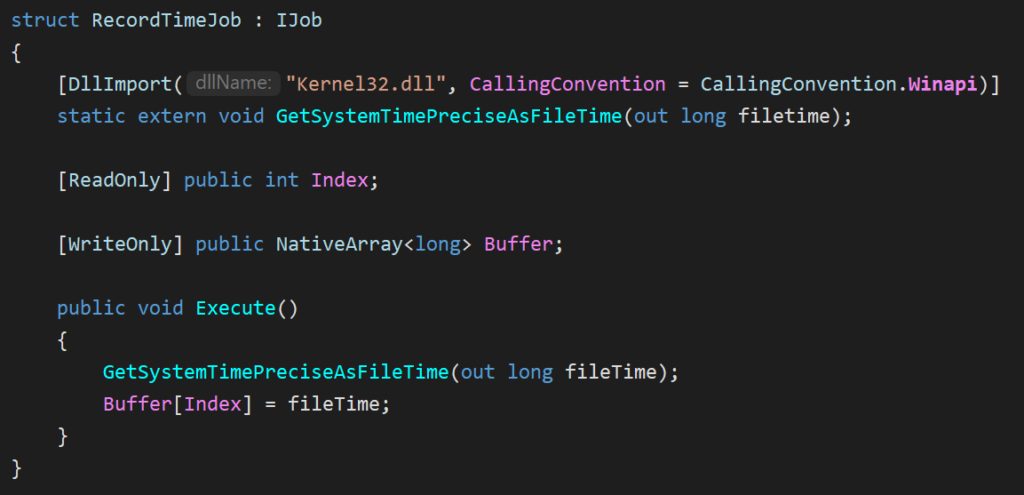
  • I allocate a timing buffer, a NativeArray<long> that holds 2 values.
  • When scheduling AccumulateJob :
    • I first schedule a RecordTimeJob with Index = 0
    • Then schedule the AccumulateJob
    • Then schedule a second RecordTimeJob with Index = 1 (using dependencies to chain all 3 jobs together)
  • In the update loop, whenever this job chain is complete, I can determine an accurate time span by subtracting the two values!

GetSystemTimePreciseAsFileTime is touted as having “the highest possible level of precision”, which is good enough for me. Sadly, this will only work on Windows, and starting from Windows 8. There’s probably a similar native API that could be called on other platforms to have high-resolution system timers though!
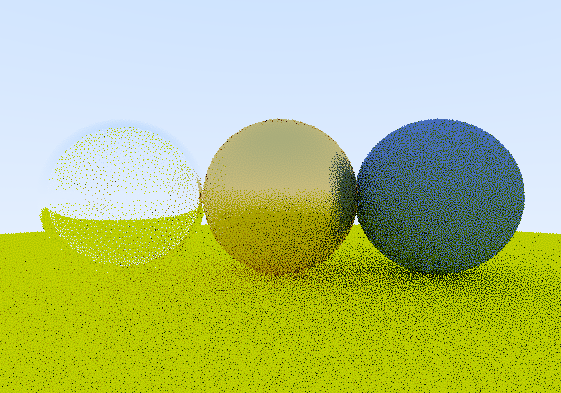
Perlin Noise

Chapter 5 of The Next Week is about Perlin noise. I initially implemented it exactly as the book describes, but I found it a bit messy. I wanted to better understand what was going on so I could modify it, and possibly optimize it.

I then found an in-depth deconstruction of Perlin noise by Andrew Kensler which provides more than enough detail to write up your own implementation. I integrated the suggested stronger hash modification (one permutation table per axis instead of a single one), and adapted the algorithm to work in 3 dimensions (which includes generating evenly distributed 3D unit vectors, using an algorithm from this source).

The result is almost visually identical to the book’s rendering, but my Noise function feels nice and tidy!

Blue Noise

As a ray’s path is being traced, there are many random decision points, like random scattering on a diffuse surface or sub-pixel jitter for anti-aliasing. In One Weekend uses a uniform random number generator, which results in white noise. I’ve read much about the advantages of blue noise from Twitter advocates like Alan Wolfe, but for a long time I struggled to understand how to correctly apply it to my path tracer’s random sampling.

In an attempt to mitigate visual clumping of random samples, I first tried stratified sampling, somewhat ignoring the warnings about the “Curse of Dimensionality” from The Rest of Your Life. My interpretation of it was to partition batches such that each sample in a batch had a partition of the random domain. I found it challenging to implement, and was only able to make it work for the first diffuse bounce (partitioning the tangent-space hemisphere in equal parts). In the end it did basically nothing for image quality, so I scrapped it.

A visualization I made to ensure that the stratified sampling partitions were equal-sized and didn’t overlap each other

Dennis Gustafsson’s post on blue noise made it really clear to me that it can to be implemented as a screen-space random data source. I used the 256×256 RGB 16-bit-per-channel HDR blue noise textures created by Christoph Peters, cycling through 8 texture variations over time. Because those textures are fully tileable, I can vary the starting texture coordinate according to a per-batch random seed, and for additional dimensions (more than 1 random sample per pixel within a batch), I apply a texture coordinate offset based on the R2 quasirandom sequence as suggested in Gustafsson’s article.

The result is a dramatic improvement in image quality, especially with a low amount of samples per pixel. Here’s the same scene at 1spp with white noise (top) and blue noise (bottom).

While it does affect performance, it’s not a dramatic impact, and I think it’s well worth it.

White noise12.75 Mrays/s
Blue noise11.5 Mrays/s

Denoising

One way to clean up renders without needing the path tracer accumulate tens of thousands of samples is to run the output through a denoiser. I implemented two options :

Intel Open Image Denoise

Intel OIDN was very easy to use. The runtime library is offered as a precompiled DLL, the documentation is clear and the API concise. Once a straightforward C# interop layer is written, usage of the API fits in 11 lines of code including initialization!

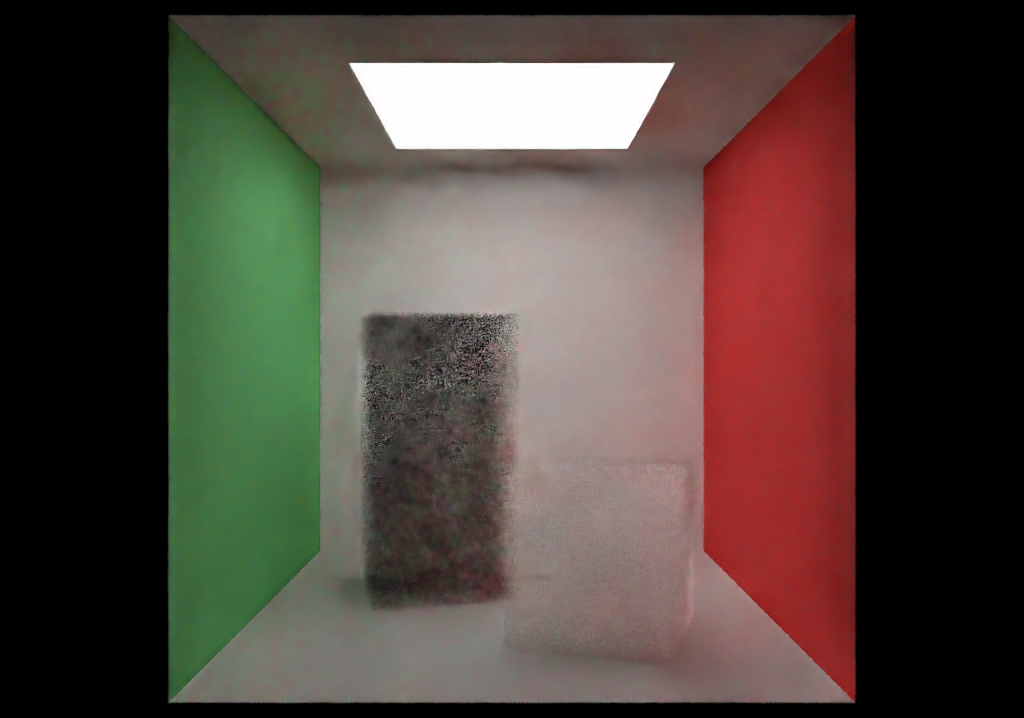
And it looks amazing.

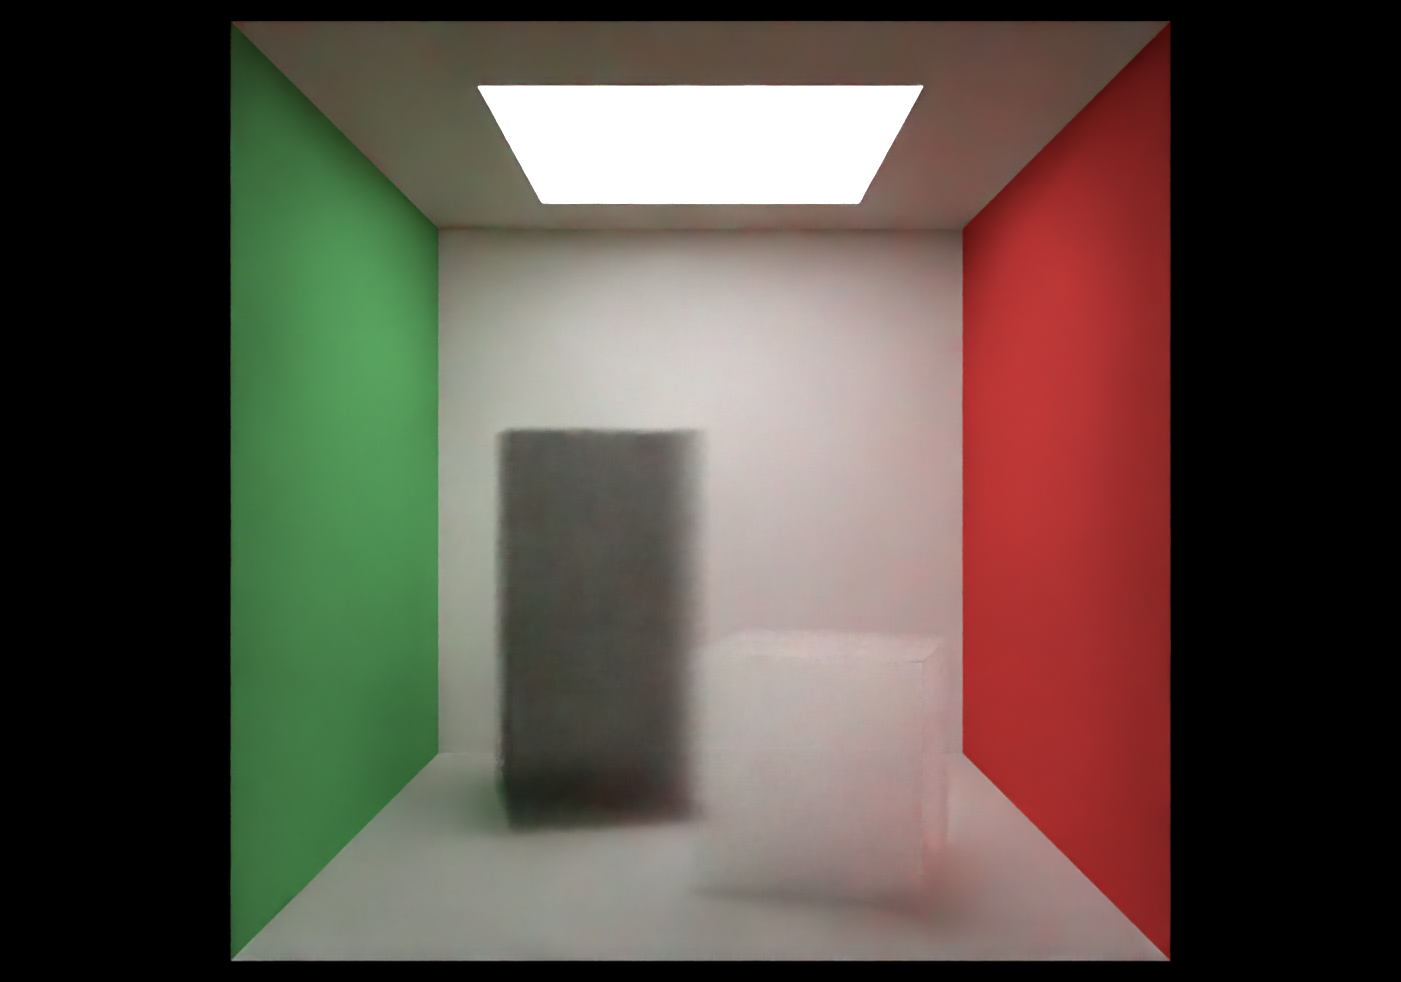
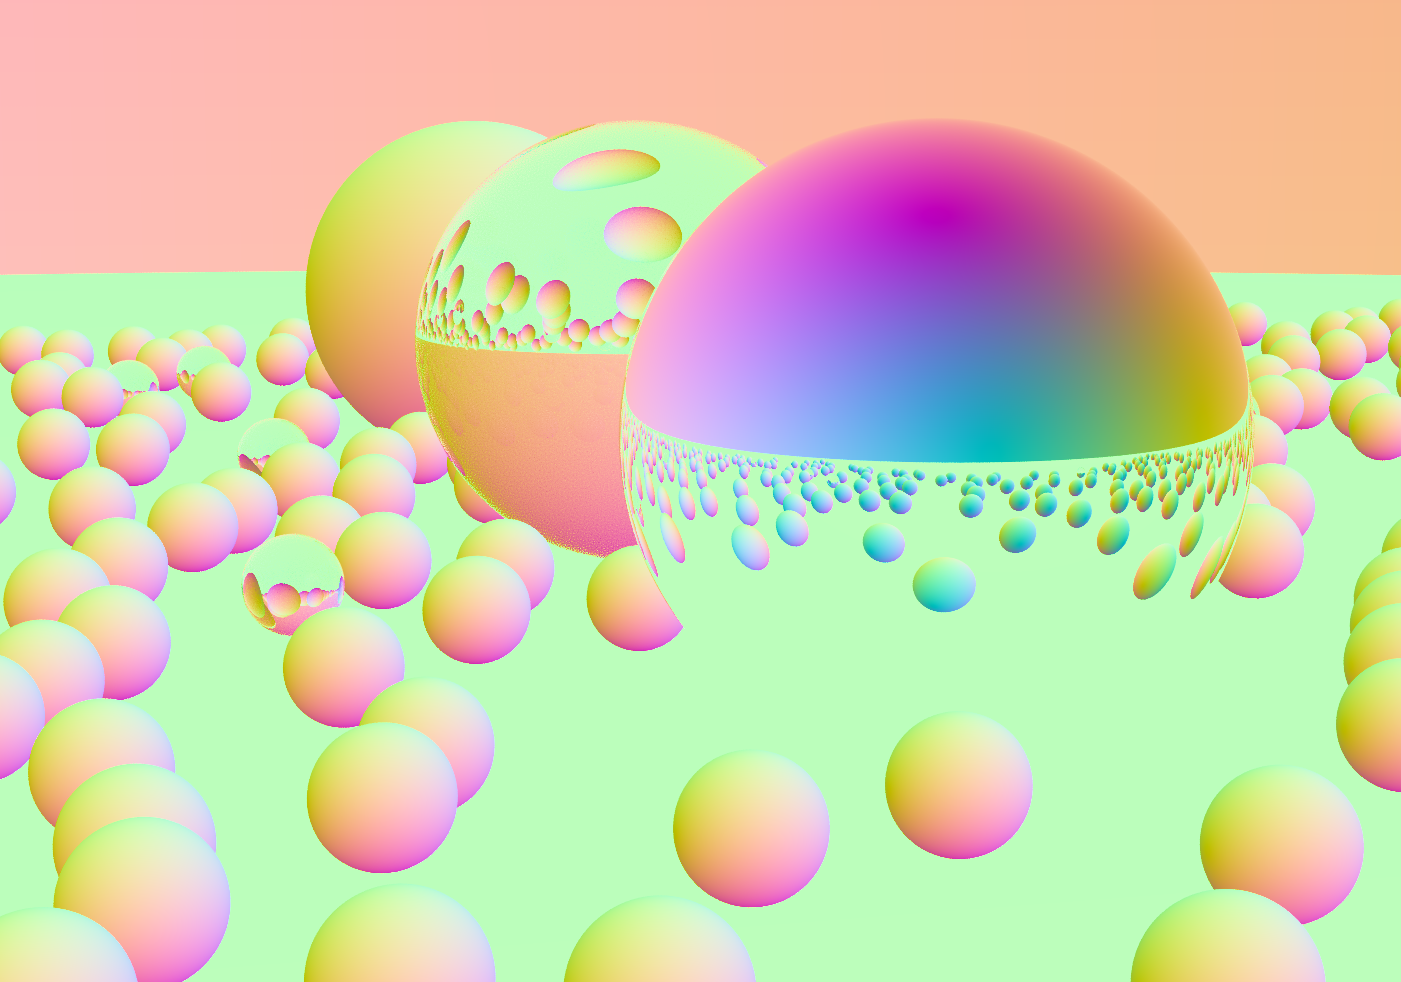
While you can just give OIDN a color image and let it do its thing, it’s better to give it albedo and normal buffers as well so that object edges are better preserved, so I added those outputs as well. The documentation states that for perfect specular materials (dielectrics or metals), one can use a constant value or a fresnel blend of the transmitted vs. reflected albedo and normal. I chose to do a cheap approximation and just keep the first non-specular material hit; it does a better job at keeping detail in reflections/refractions than using a constant albedo and the first hit’s normal.

The only sad thing about it, is that on my Core i7-5820K, it’s not exactly quick. Denoising a 1920×1080 frame takes about 2 seconds, but at least it’s a fixed cost and does not depend on scene complexity or sample count.

nVidia OptiX AI Denoiser

nVidia’s denoiser was significantly harder to work with, but has its advantages. At first, I couldn’t figure out how to use in a C# context. Their website offers an SDK, but no directly usable libraries for the denoiser itself. I ended up asking on the DevTalk forums about the way to go, and with the directions they gave me and by inspecting the official samples, I was able to build a pretty light native library that provides all necessary entry points to use the denoiser from C#.

Usage isn’t trivial either. Because OptiX works with CUDA buffers, there’s a bunch of initialization and copying around from CPU memory to GPU memory required to perform denoising.

Quality-wise, it doesn’t compare to Intel OIDN. There is no support for normal buffers in OptiX 7.0, so I couldn’t feed it into the denoiser, but it does support a LDR albedo buffer input.

However, it runs an order of magnitude faster. The same 1080p frame takes about 110 milliseconds on my GeForce GTX 1070! This makes it possible to denoise at interactive rates for smaller buffer sizes.

256×144, 3 samples per pixel, with nVidia OptiX AI Denoiser

Added Rendering Features

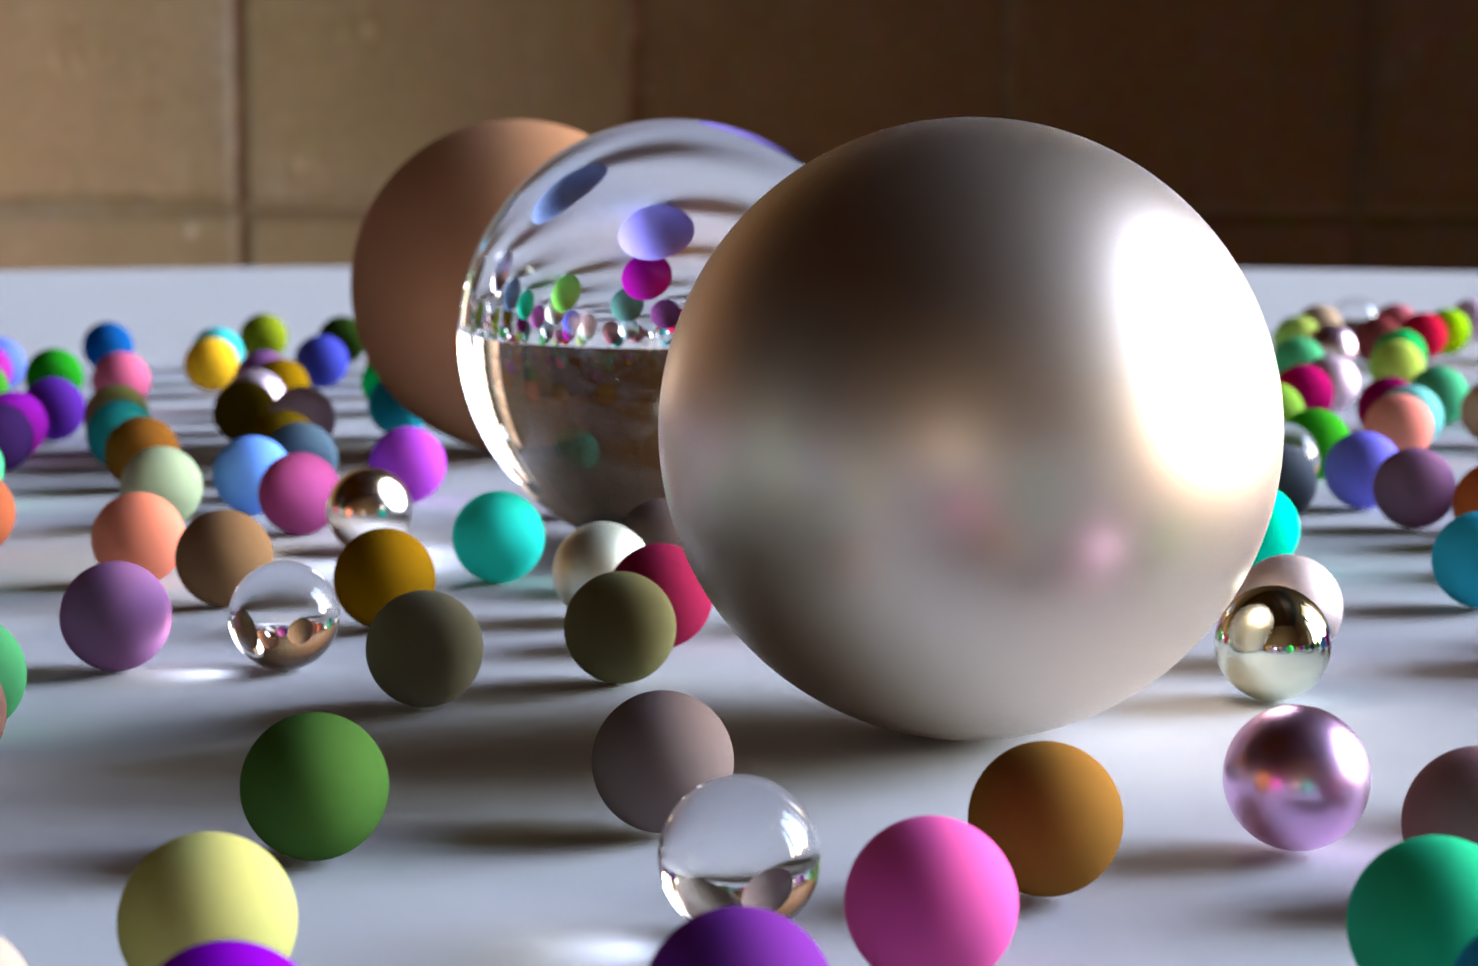
HDR Environment Cubemaps

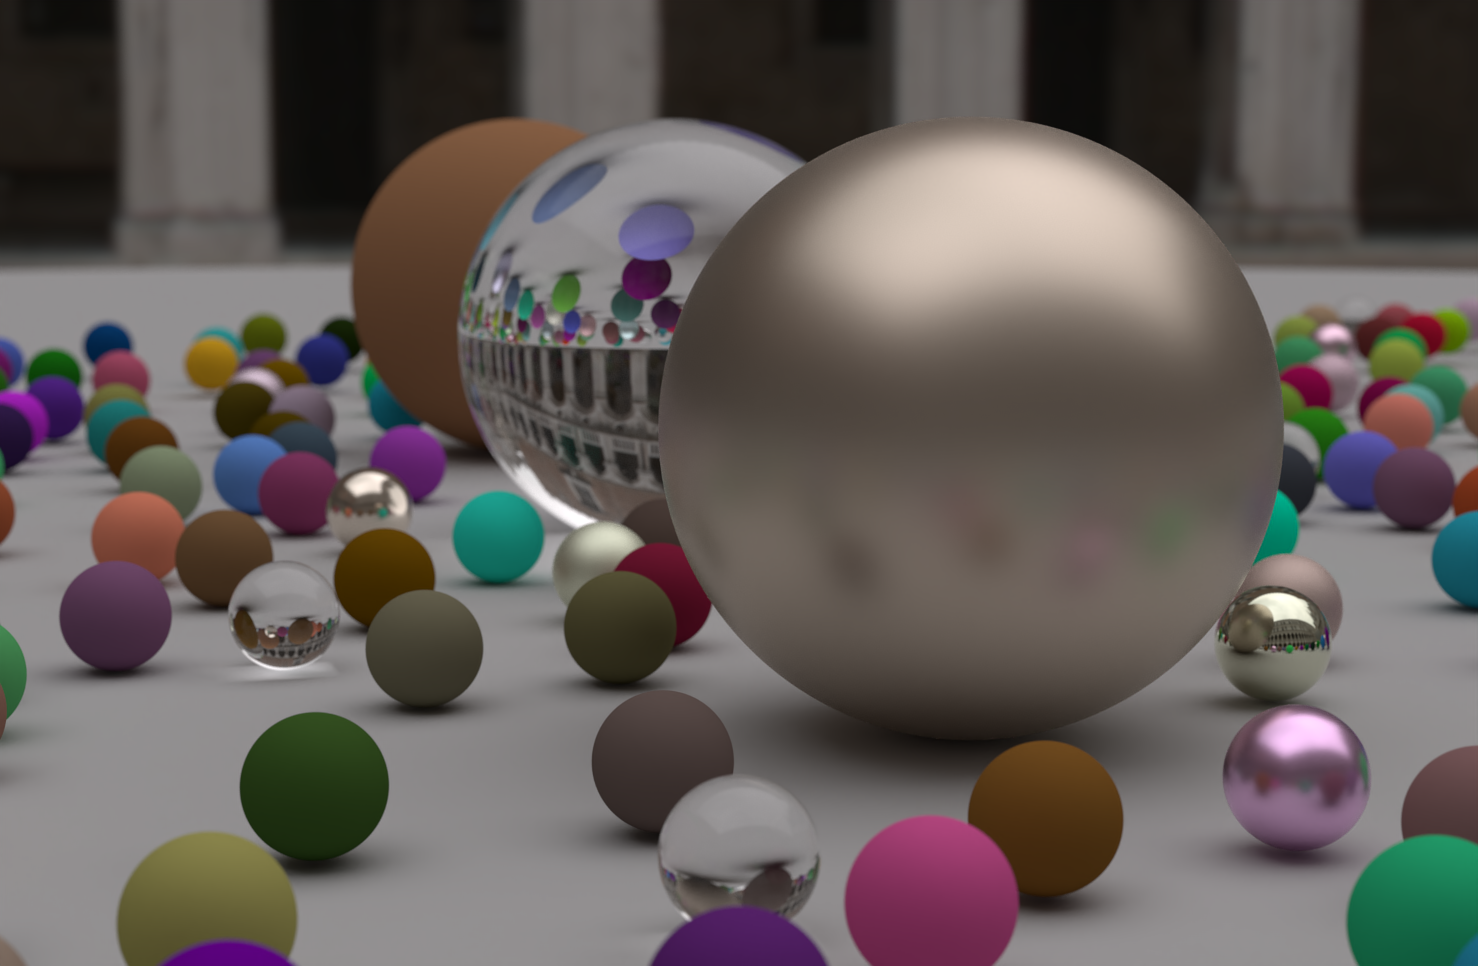
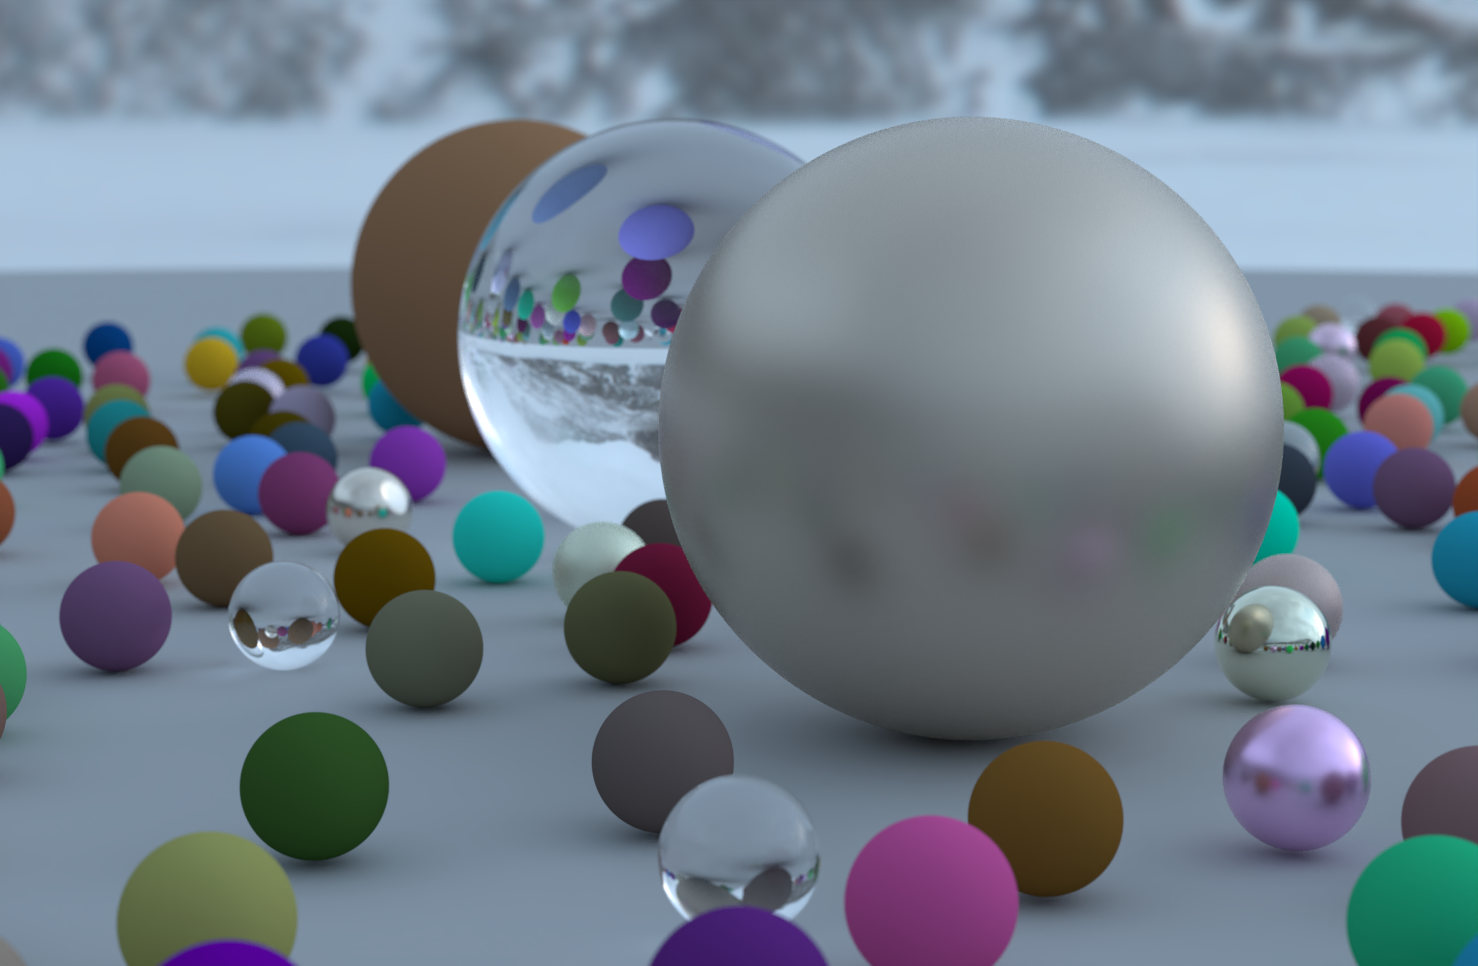
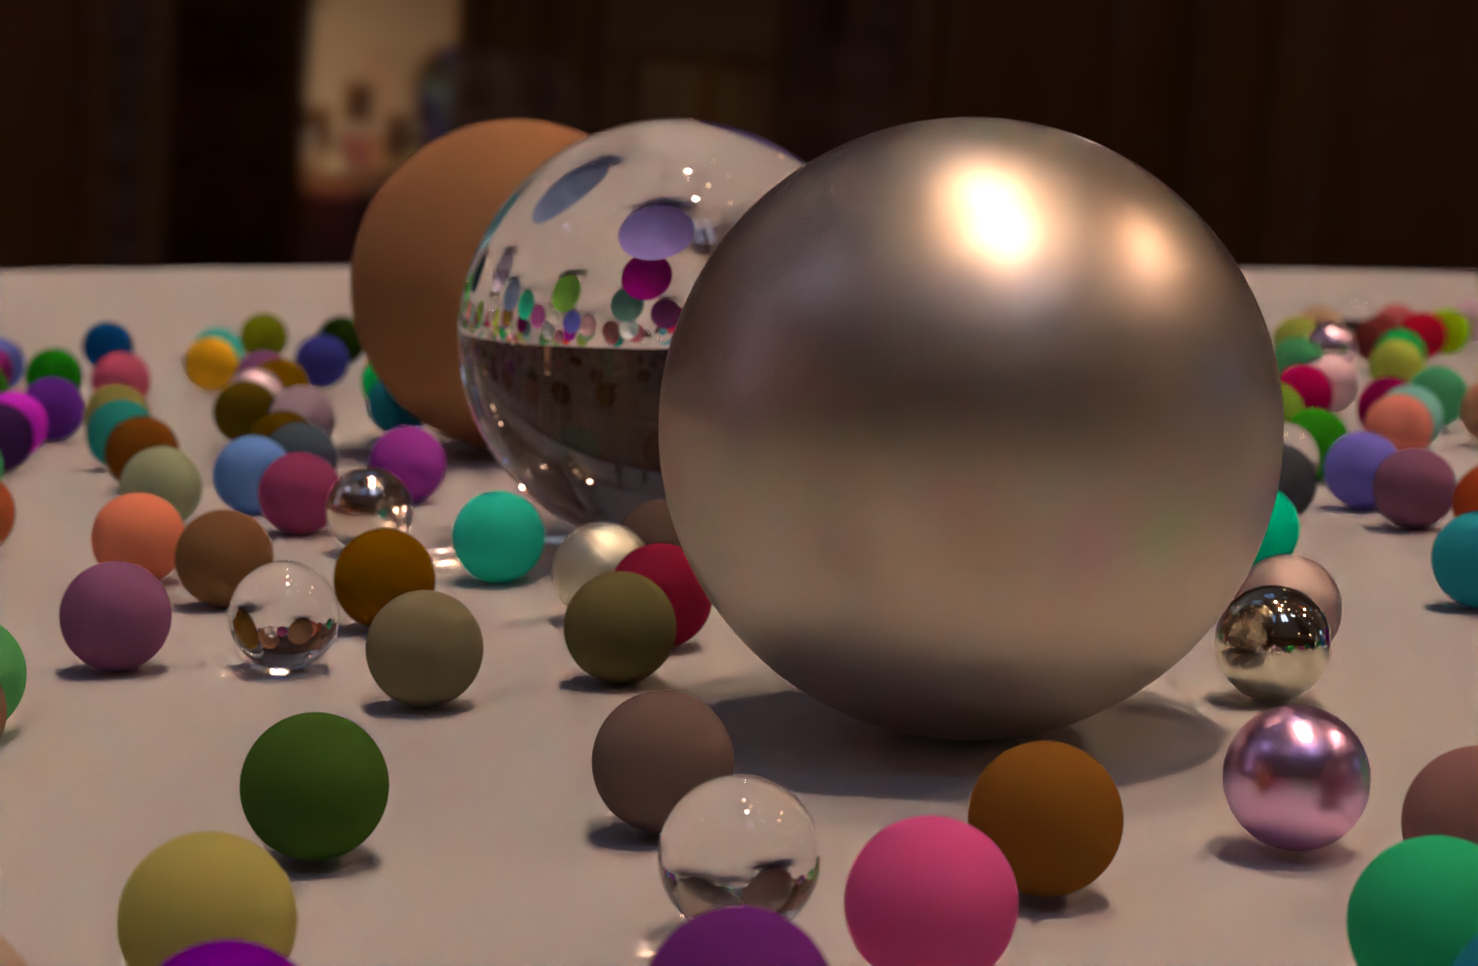
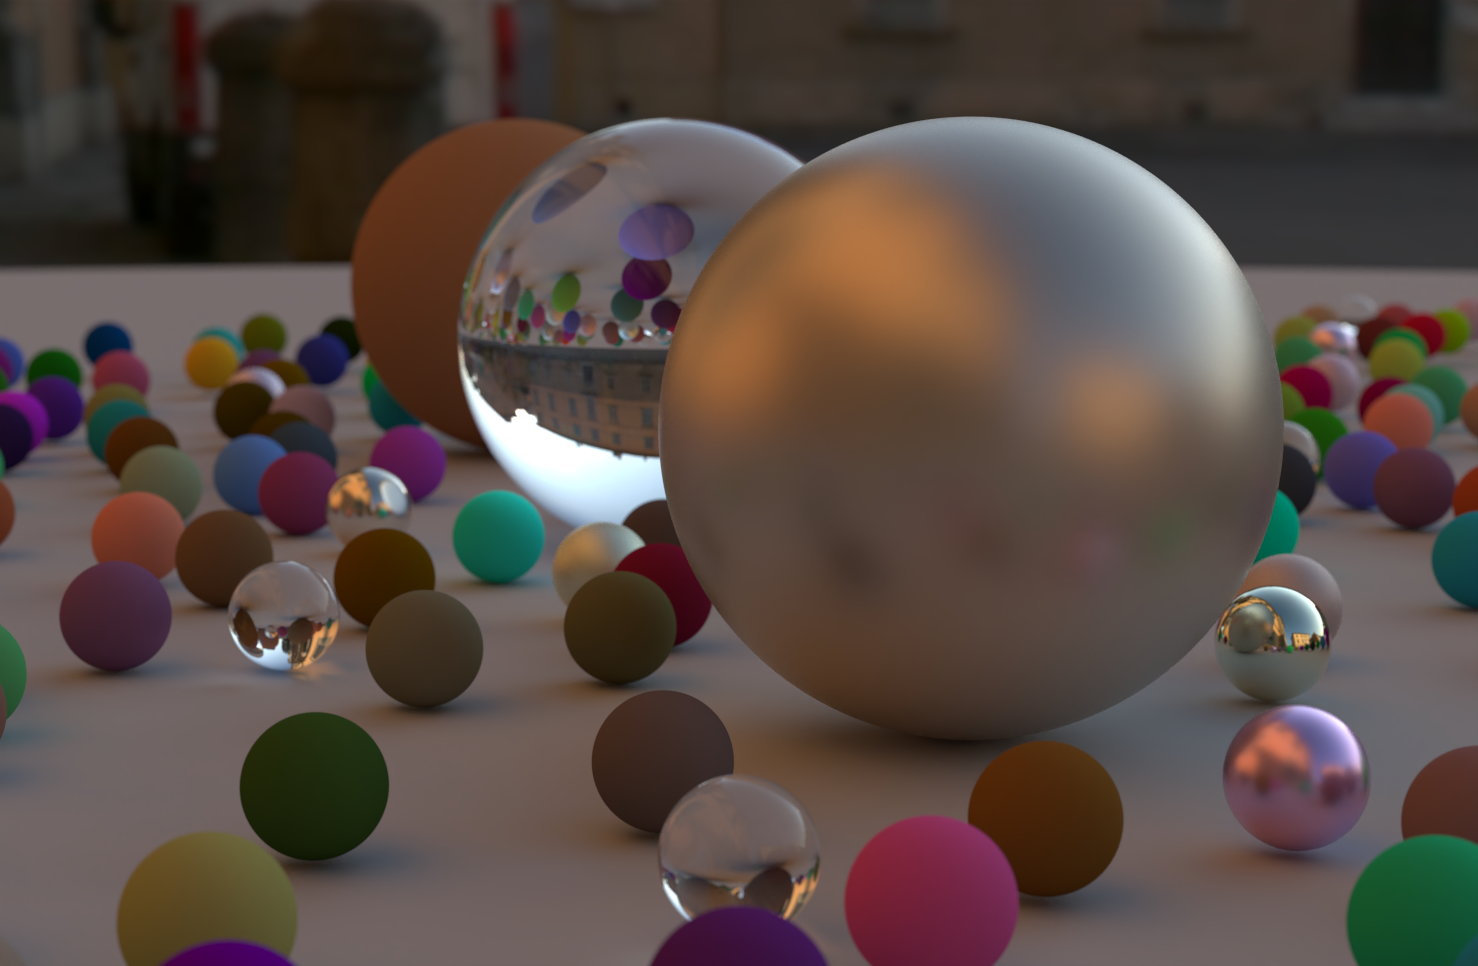
While the book’s gradient sky looks nice and minimalistic, I really wanted to add support for light probes as the background for path traced scenes. There were a few challenges with this feature :

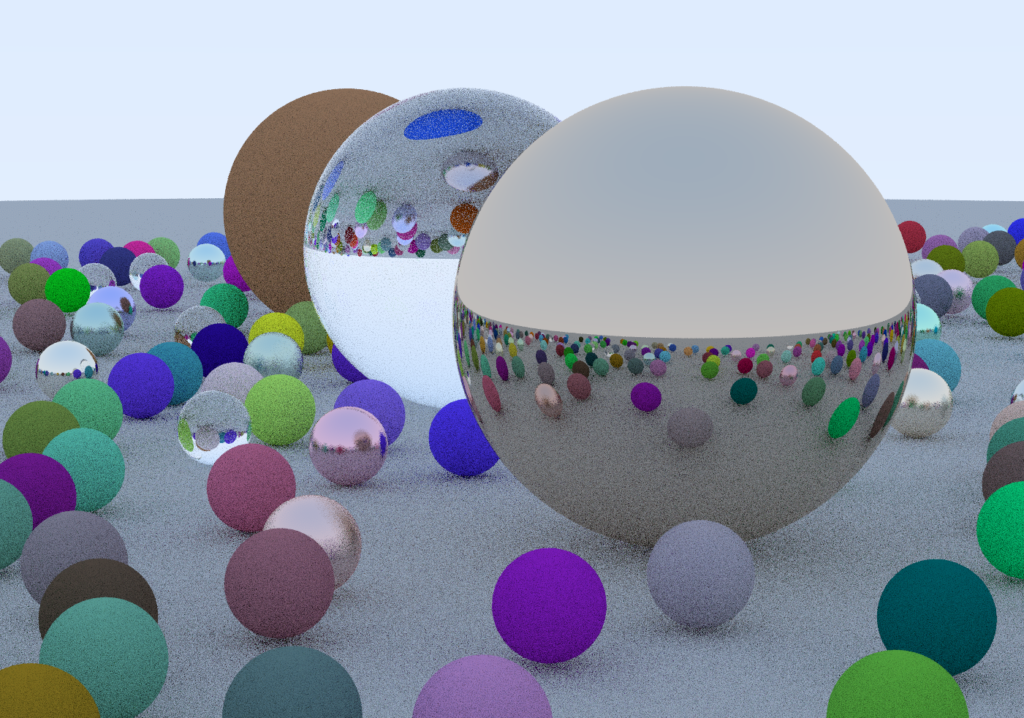
Roughness Textures for Metals

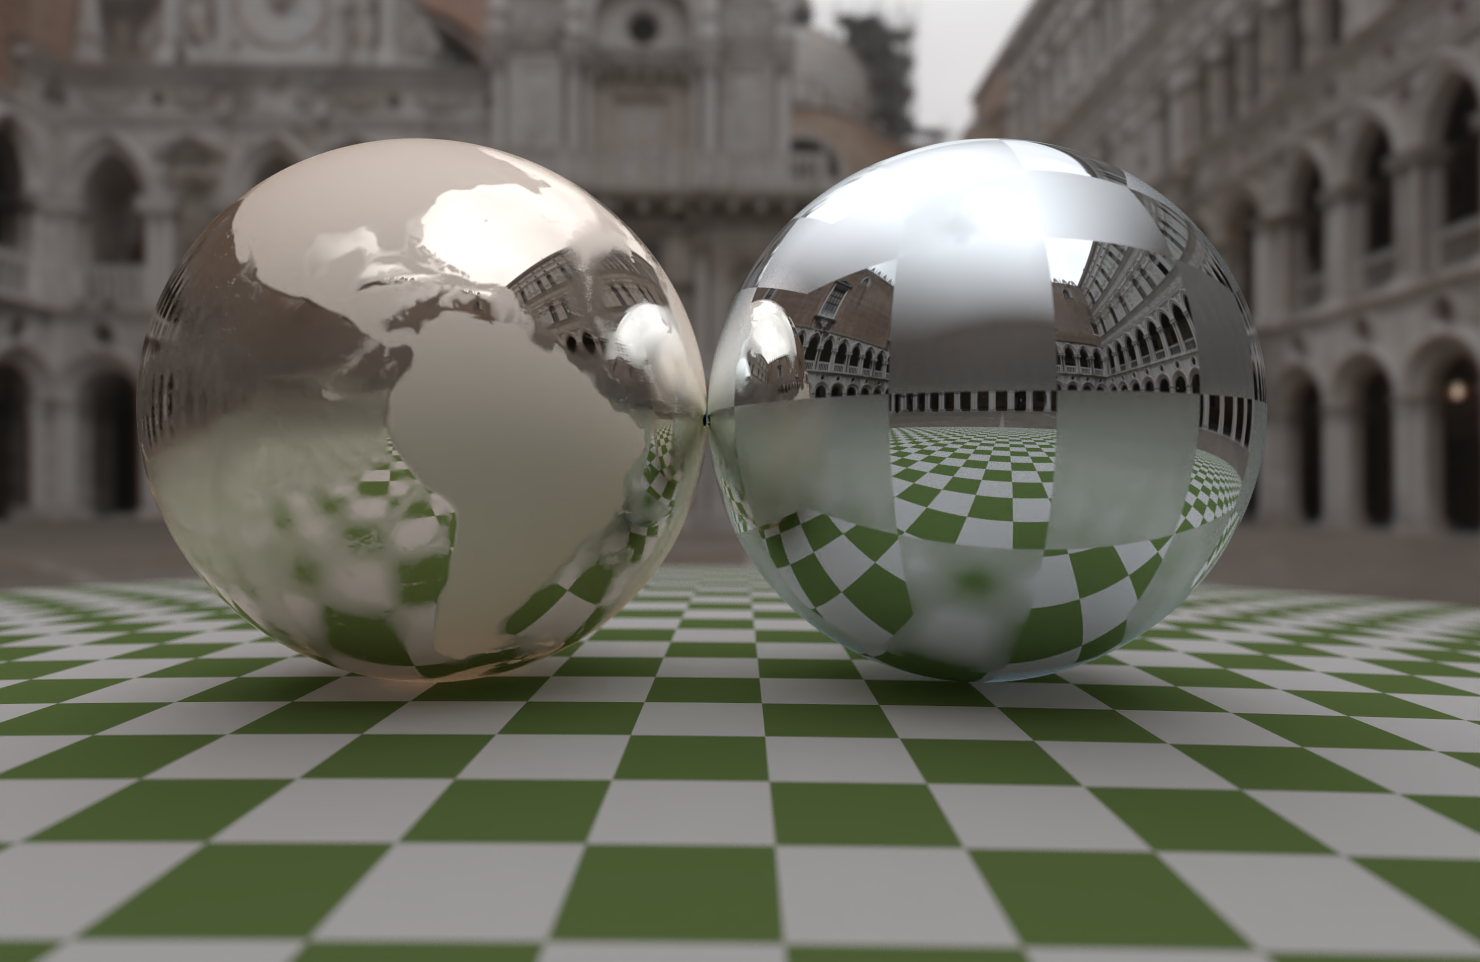
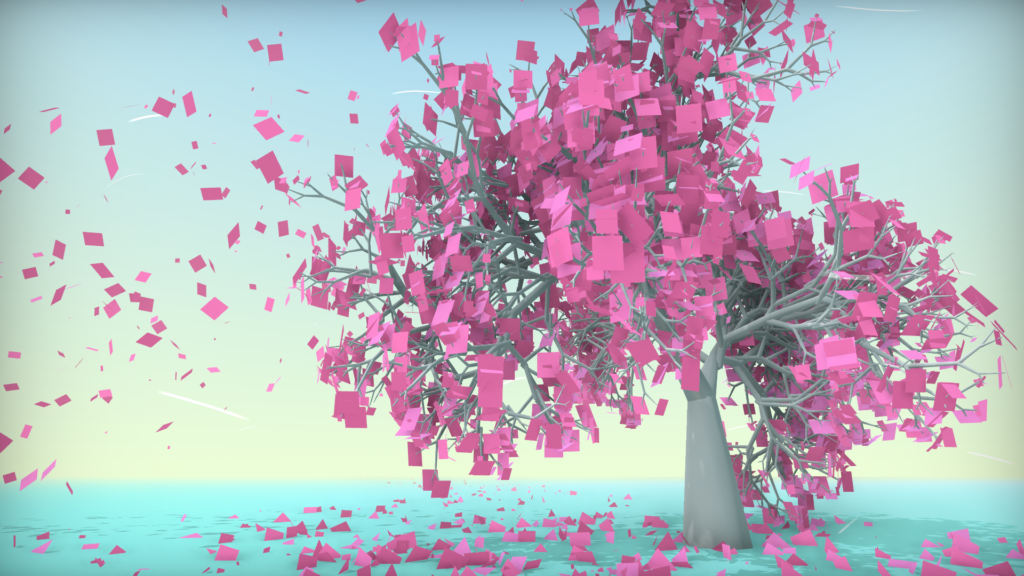
This was a simple one : instead of a constant value for fuzz in metals, provide a generic Texture such that it can be sourced by a pattern or an image. Looks great with cubemaps!

Tinted and Frosted Glass

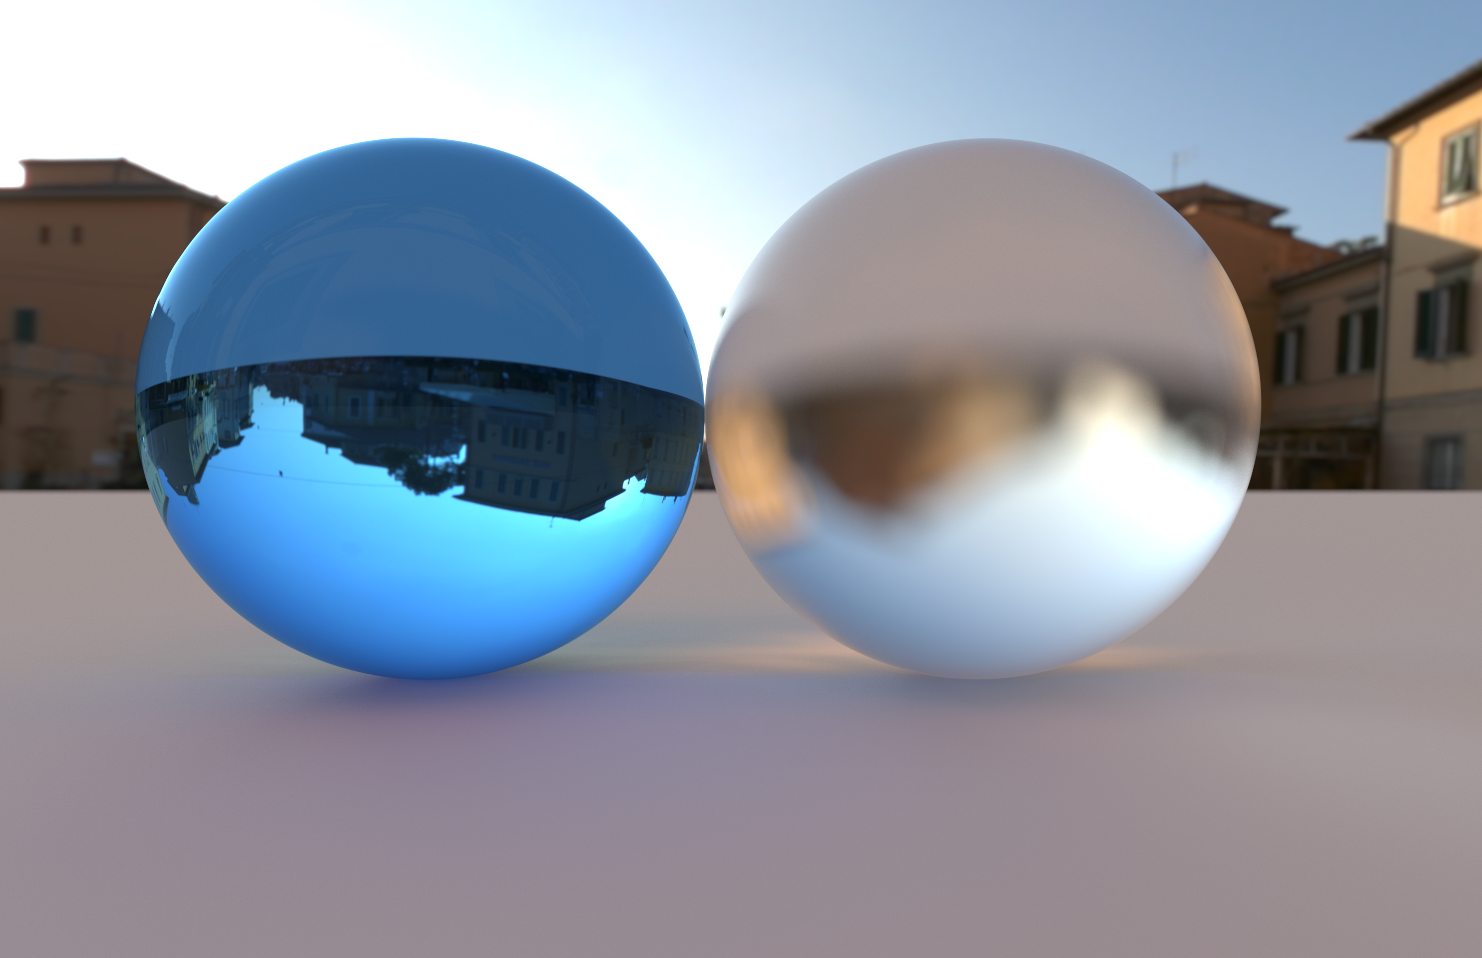
Tinted glass was also extremely simple : just make dielectrics sample a Texture instead of defaulting to white. It’s more like the surface were tinted rather than the material of the glass itself. I think probabilistic volumes are a better fit if the tint should be in the object’s volume.

Frosted glass started out simple, but I had to iterate a bit to get it right. After posting an initial version on Twitter, Trevor David Black guided me to a more accurate way to integrate roughness for dielectrics. The main idea is that roughness represents microfacet perturbations, and it should be applied to the surface normal before doing all the reflection and refraction math.

Interlaced Rendering

When rendering complex scenes at a high enough resolution, even at 1 sample per pixel, rendering of a single batch can take several seconds. To keep the scene controls interactive in this situation, I added an interlaced (or interleaved) sampling option that only draws lines of a certain multiple. The batches will run through a sequence of line offsets such that all lines are eventually filled out, and the full image is accumulated for the requested amount of samples per pixel. To avoid black gaps between missing lines, the Combine phase duplicates lines when samples are missing, looking around for existing data.

Scene Editing

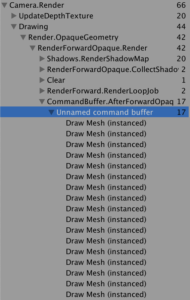
While I appreciate how straightforward scene building in the books is, I wanted to try a data-driven approach that allowed me to preview what a scene looks like before spending time waiting for it to be rendered. So I exploited Unity’s Inspector to provide an editable scene description, and used Gizmos and CommandBuffers to provide an edit-time preview of the scene in the Game view.
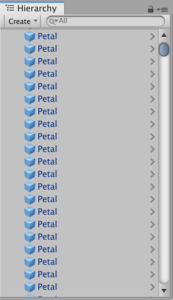
The gizmos representing objects in the scene are selectable and draggable, even though they don’t have a GameObject representation in Unity’s scene hierarchy.

Above is the world makeup of In One Weekend‘s final scene—there is no custom code required to build it… except that Random Entity Groups are specially modeled so they can support building this particular scene. 😅
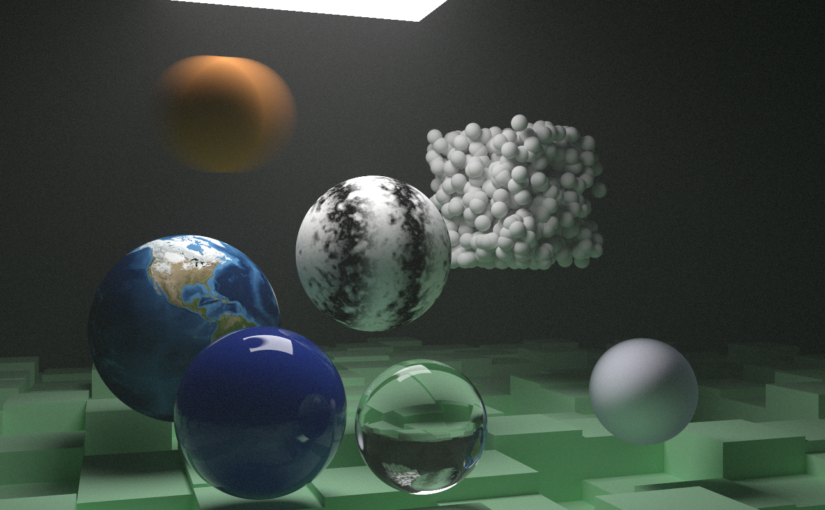
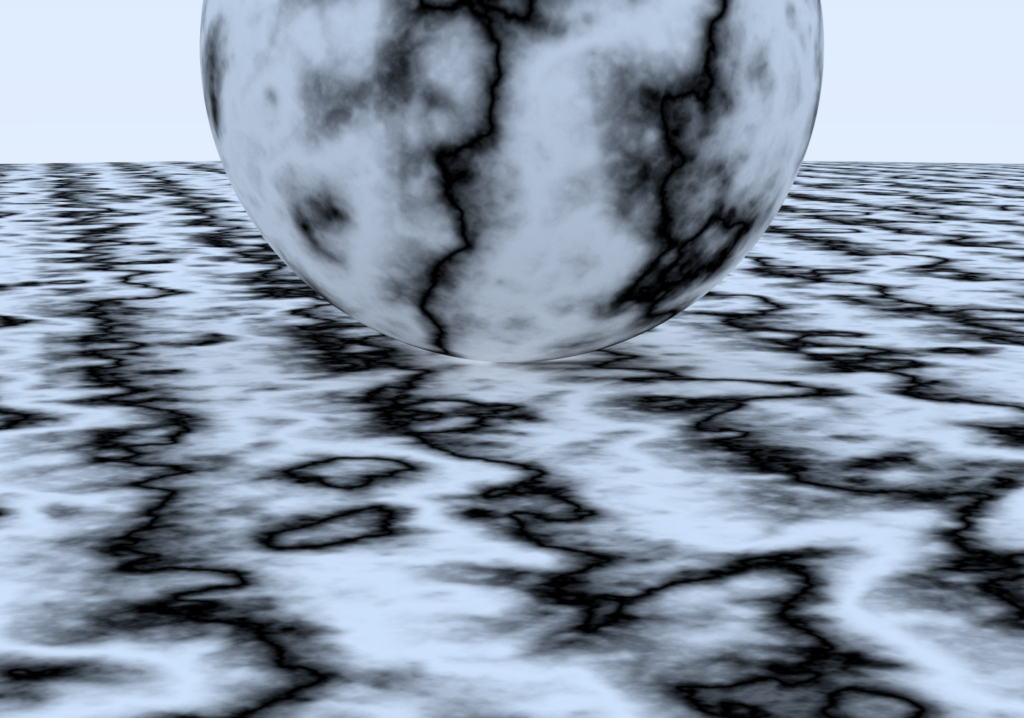
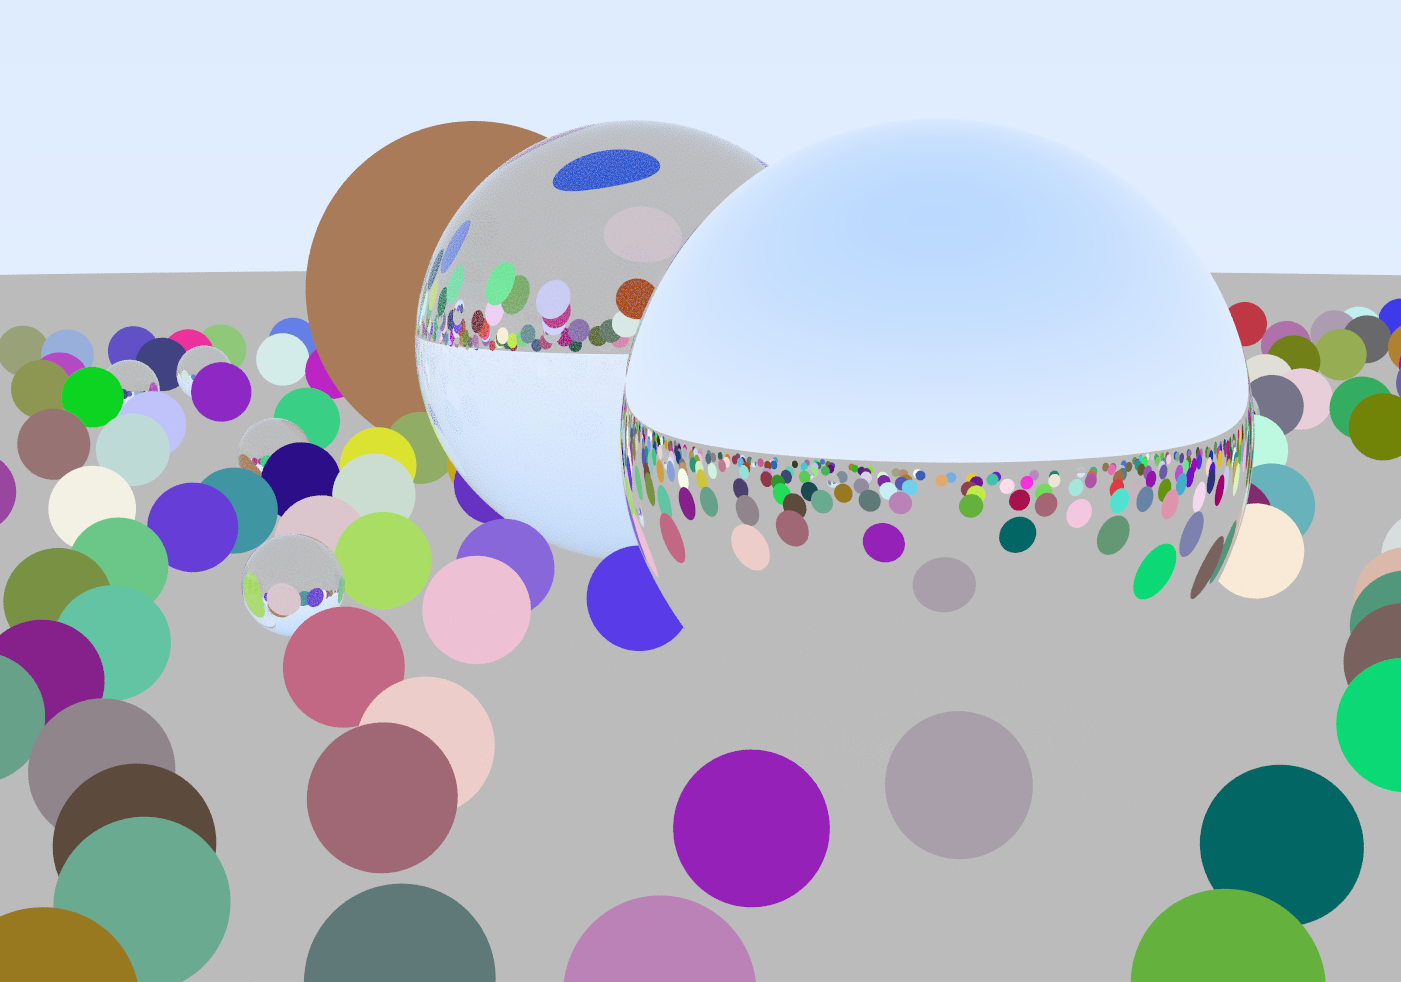
However, it can be used to build different-looking scenes. Here’s a quick planet system kinda scene I built using the same random scene generator, but with different data :

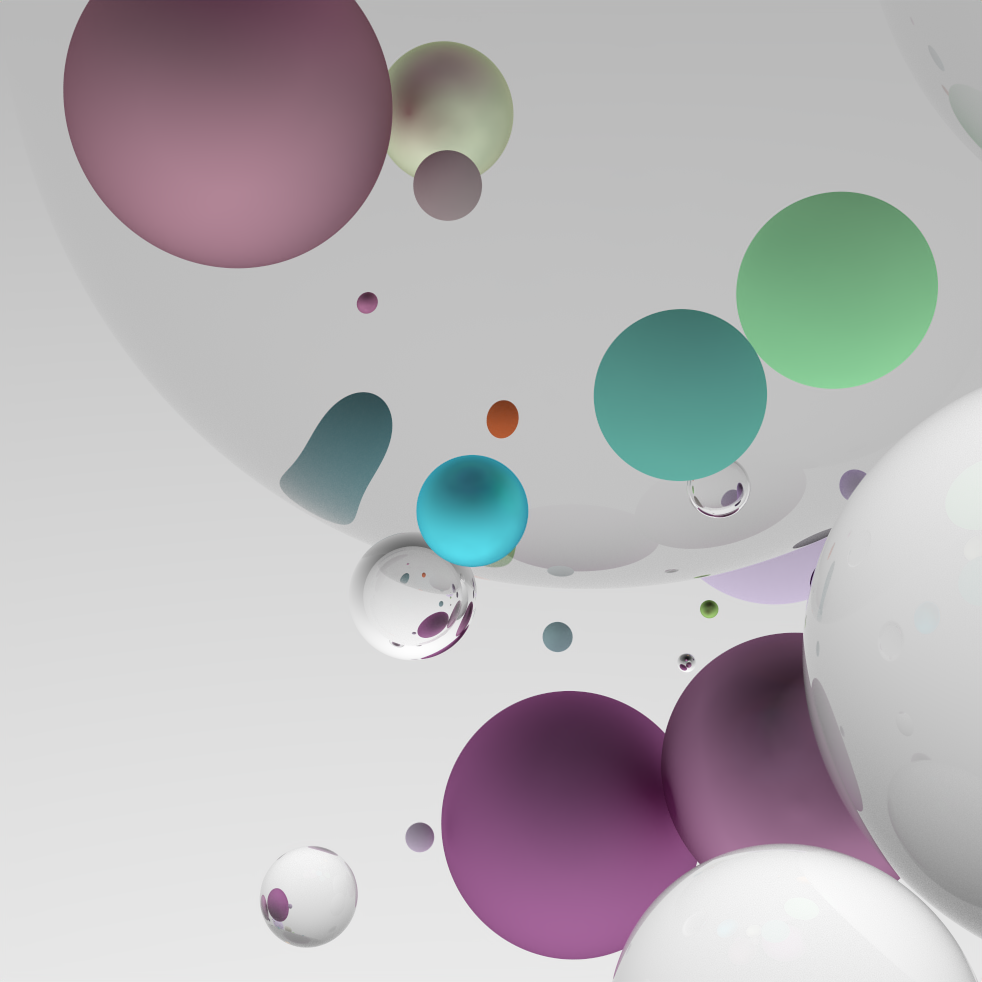
All scene properties (material type and properties, object transform, camera setup) can be customized in the inspector, even as the scene is being rendered.

Scene description objects have two representations in code :

  • A serializable, editable data class that contains lots of Odin Inspector attributes for nicer inspector presence (all contained in the Scripts/Data folder)
  • A leaner, immutable struct version for runtime usage, which usually contains code for rendering this entity or concept (e.g. Material, Sphere)

My only regret with this system is that I depend on the Unity editor for most things. If I had gone with Dear ImGui instead, I could make a faster standalone build and still allow for scene editing. Maybe one day…

Loose Ends & Conclusion

While it’s been smooth sailing for most of the project, some features did not work out like I wish they would have.

  • I tried replacing the book’s metal BRDF with importance-sampled GGX, but the math went way over my head and I gave up on it.
  • While importance sampling in general appears to work, I don’t think my math is right at all. For instance, I should be able to change the random distribution for lambertian scatter and still get the same visual results (because factoring in the PDF should even everything out), but that is not the case.
  • I tried doing a SIMD BVH traversal mode, but all I tried gave me worse performance, so I abandoned it.

And because making a path tracer is a never-ending project (as Peter Shirley alluded to in the title of the third book), there’s a dozen areas where I could keep adding things, but I think now’s a good time as any to stop… for a bit.

If you got this far, thanks for reading, and special thanks to my amazing wife MC who let me work on my balls night after night after night, despite not really understanding the appeal. ❤️

Meditations – April 8th 2019

In March 2018, I attended Train Jam and chatted there with Rami Ismail about a project he was starting up : contemplative, 5-minute games released day-by-day. I thought it was neat, but I didn’t commit to anything since my time for side-projects is super limited.

In late November 2018, I was asked by Jupiter Hadley whether I’d like to contribute to a super secret project she and others were working on… I asked about details, and realized it’s the same thing Rami pitched me months earlier : Meditations! Jupiter explained that I should spend no more than 6 hours on the project, and submit it before December 14th 2018. The timing worked out, so I decided to give it a go.

I picked April 9th as the date (it was moved back 1 day to April 8th after the fact), and started browsing my Google Photos to see what the heck happened on an April 9th in my life… 2013 jumped out as a memorable one. My then-girlfriend (now wife) MC and I went to Nara, Japan where we met bowing deer and strolled the city on a beautiful sunny day. The cherry trees were at the peak of their flowering time, and they shed pink petals everywhere.

Yours truly, making friends with the locals

So I figured I’d do a little vignette game with a tree, falling petals, and heavy emphasis on the soundscape. I wanted it to feel vaguely like Proteus, with a Boards of Canada kind of musical vibe. Other stylistic references I had in mind : Devine Lu Linvega‘s Kanikule, and @ktch0‘s Places.

I asked my friend and colleague Rodrigo Rubilar whether he’d like to do sound design and music. I originally planned to do it myself with my limited audio gear, but I was excited to work with him on a small project like this, and he’d produce quality results 10 times faster than I could! We jammed an afternoon on an ambient track with a few layers, and one-shot sounds for the leaves hitting the ground.

https://twitter.com/renaudbedard/status/1073678256304316416
Rodrigo’s home studio is a goldmine of analog audio gear

At the same time I started hacking at a fractal tree generator in Unity. It’s actually the first time I’d tried to write one, so it was interesting to see how the simplest algorithm could apply to 3D, with some randomness injected into it. I exposed a ton of parameters, and played with them until I was happy with the result.

Fractal tree generation in action

Then I started thinking about the petals, and how I wanted them to move in the air. I started with a basic Unity particle system and wind zones, but I suck at authoring those and I could never get the look I wanted. So I resorted to manually updating the petals with simple physics. But then I wanted a lot of petals… thousands of them. So I started toying around with Unity 2018’s job system.

Optimization ended up being the most interesting engineering aspect of the project for me, and the biggest time-sink. There is no way I respected the development time limit of 6 hours (probably spent more than 40 hours on it), but it was hard to let go. So I’d like to at least document what I ended up doing and why.

If you just want to look at the code, it’s all here.

Jobified update

I ended up with a single job that does most petal-related work :

  • Update physics based on wind parameters
  • Detect ground collisions
  • Detect player interactions (you can rise petals from off the ground by walking near them)

I want to update all the active petals every frame, so I schedule the job in the earliest Update callback (you can tweak that using Script Execution Order), and complete it in LateUpdate.

I wanted petals hitting the ground to trigger sounds, so the naive way of making this happen in Unity (and my initial approach) is to have one GameObject per petal, with an AudioSource component. The AudioSources don’t have to be enabled all the time, only when they’re playing a sound, but that does mean that I have to update their Transform so that the sound plays at the right 3D position.

It’s possible to access and update Transforms from within a job by implementing IJobParallelForTransform, and pass the transforms to the job using a TransformAccessArray. A major gotcha with the current version of the job system is that only root Transforms will be assigned to different threads. I originally had petals as child of an empty game object just for grouping, but then my job was using a single worker thread. Reading this forum post explained it, but it’s still baffling to me, and makes for a pretty hideous Hierarchy tab.

I ended up not using Transforms for petals at all, but more on this later.

One thing that I found interesting is how one returns data from the job to the game code. For instance, I want to know which petals should trigger a sound by returning a list of petal indices that touched the ground. You can declare a field in the job as NativeQueue<int>.Concurrent (which is part of the Collections package) , and enqueue data as the job runs on multiple threads. From the calling site, you need a NativeQueue<int> to be created, but when it’s passed to the job instance, you need to use the .ToConcurrent() method to make it usable. Then, once the job is complete, you can use .TryDequeue() to extract elements from it. Works great!

I enabled Burst on my job very naively, and spent zero time optimizing the generated code. I did take care of the basics : make sure to mark job fields appropriately as [ReadOnly] and [WriteOnly], use the SIMD-capable Unity.Mathematics package whenever possible. In the end, the job runs way faster than I need, so I just moved on.

Burst had a dramatic effect on the job’s performance. Here’s a profile of the same code running on the same system, with Burst compilation toggled off and on. The biggest noticeable difference is that LateUpdate does not need to wait on jobs at all when they are Burst-enabled, which means it runs fully in parallel!

Longest job without Burst enabled : 1.70ms
Longest job with Burst enabled : 0.05ms

Rendering

Note : even though I’m using Unity 2018.3, I did not use the Scriptable Render Pipeline in this project, so the following probably only applies for the legacy rendering pipeline.

I initially had every petal GameObject with a MeshRenderer, a simple quad mesh, and the Unity Standard Shader with instancing turned on. It definitely worked, but Unity spent a lot of time in culling and batching, and I thought I could do better… by short-circuiting it completely.

It might sound like rendering everything all the time is a bad call, but in this game, the worst-case scenario of all petals being visible at once is the very first thing you see. Might as well make it a fast general case!

One way to draw objects manually is to use Command Buffers. By specifying a mesh, a material and a bunch of transformation matrices, you can use the DrawMeshInstanced() method to draw up to 1022 (that number I got empirically, but it appears to be undocumented) instances at once, in a single call. There is no renderer on the game objects themselves, so Unity acts as if they don’t exist, apart from issuing draw commands.

My petal update job’s final step is then to bake the petal’s current position, rotation and scale into a 4×4 transformation matrix, so that I can use them in my command buffers later. But there it gets annoying :

  • DrawMeshInstanced() takes a Matrix4x4[], nothing else, so we’ll have to copy our NativeArray to a managed array.
  • We have to respect the batch size of 1022, so we have to use NativeSlice to take 1022-element slices of our NativeArray.
  • NativeSlice.CopyTo() copies element by element, and it’s very slow.

I found a faster CopyTo implementation on the Unity forums which I slightly modified, and it does perform much better, but it’s a lot of moving data around for no reason. I wish that NativeSlices were directly usable with command buffers.

I end up with two very similar command buffers : one for depth rendering inside shadow-maps and for the camera’s depth pass, and one for regular opaque rendering.
The depth rendering command buffer uses the ShadowCaster pass from the Standard shader, and hooks to the AfterShadowMapPass event on lights as well as the AfterDepthTexture event on the camera. I needed the camera depth pass for SSAO using Keijiro Takahashi’s MiniEngineAO Unity implementation.

Triggering audio

As I hinted to earlier, I ended up ditching GameObjects for petals entirely. The only reason I originally kept them around (and updated at all times) was for audio, but it’s a lot of data shuffling just for sporadic sound triggers, so I opted for a simple audio trigger object pool instead.

I pre-initialize 1500 (again, empirical) dummy GameObjects with a disabled AudioSource component that lay dormant in the pool until an audio event happens. At that point, I take one from the pool, enable audio, position it at where the impact happens, and play the audio clip. There is no update cost to having them around otherwise, and they are disabled & returned to the pool when the sound playback is complete.

Petals are then strictly represented by a data structure that lives in a NativeArray, not by a GameObject. And the update job becomes a IJobParallelFor, mutating elements of that array. Neat!

You may wonder how dramatic a performance difference this makes. So here’s a comparison, taken from the same Macbook, of the CPU time spent only scheduling jobs between the version using Transforms and the version without. Something about how Unity handles transform access to a job definitely incurs sizeable overhead.

Using Transforms (1.79ms spent scheduling jobs)
Without Transforms (0.03ms spent scheduling jobs)

Bending the tree

When I had the petals mostly working well, it still felt strange that the tree didn’t animate at all. I wanted branches to sway in the wind, and I figured I could make that happen easily in its vertex shader.
It turned out to be a lot trickier than I expected, for a few reasons :

  • The tree is generated as a single baked mesh, there is (ironically) no tree structure to it. No great reason for this apart from lack of foresight.
  • The petals aren’t really attached to branches, their position is just set to the endpoint of branches when generating the tree.

To make the smaller branches bend but not the trunk, I set a bendability parameter during generation (how far away from the trunk that vertex is) in the texture coordinates.

A visualization of the bendability parameter for a generation

I then define the a bend axis perpendicular to wind direction, a bend angle dependent on wind force, and a shake factor which is just a bunch of low-frequency and high-frequency sine functions multiplied together, to make it feel a bit more noisy & organic.
These variables are mapped to shader globals, and I used keijiro’s angle-axis to float3x3 HLSL function to apply this in the vertex shader of my tree. So far so good!

Where it got tricky is for petals. I need to differentiate when they’re attached or detached, so I can apply the wind bending selectively. I ended up using a MaterialPropertyBlock to have per-instance data (a single float) encoding this state.

In the vertex shader (which is part of a simple Surface Shader), it took me a minute to understand how to do world-space transformations on vertex data. The simplest way I found was to transform the vertex to world-space, and take it back in object-space when I’m done. Not super efficient… ¯\_(ツ)_/¯

The full vertex shader for petals, color-coded by the lovely Rider

On the application-side, I did use a NativeArray<float> for instance data, but I’m not sure it’s the easiest way to go about it. I don’t actually read from or write to it from within my update job, it’s all happening in the regular Update(). It allowed me, however, to re-use Slice() and CopyToFast() to make 1022-sized chunks for rendering.
One thing to note : unlike with the draw arrays, MaterialPropertyBlocks cannot be reused for multiple batches, so I create all the ones I need up-front and iterate through them.

Another thing I realized, is that I need to apply the exact same function I used in the vertex shader to my petals the moment they are detached from the tree. This effectively bakes the tree’s bend at that moment in time into their transform, and avoids them visually warping around as they are detached.

In the end it still looks kinda stiff, but it’s better than the cement tree I started with.

Closing thoughts

I’m super happy with the final result. It’s relaxing, soft, yet sometimes surprisingly intense. It ended up feeling a lot more mournful than I expected, but I’m fine with that. I really enjoy the visual transition from a mess of pink sheets of paper to a menacing, pointy web.
But since everything was done in a rush, there’s some things I wish I’d done differently.

In Feburary 2019 I stumbled upon this rather excellent tree by Joe Russ, developer on Jenny LeClue :

https://twitter.com/Mografi_Joe/status/1100507496572223489

It made me realize that my tree shape and animation could be so much better. Having the branch splits be less even, more jagged and well, tree-like, would add a lot. And by having the branches hierarchically laid out, I could have bent the sub-trees and produce a much more convincing wind swaying effect.

Spending so much time on performance optimization made me wonder if doing a whole forest of trees, instead of a single one, would be possible at all. Wouldn’t that be neat? But it brought additional headaches that I didn’t want to deal with.

But there’s something to be said about making a small thing, with a tiny scope, a reasonable amount of polish, and putting it out there. Just the fact that I was excited enough about making this that I convinced Rodrigo to tag along made it worthwhile.
So big thanks to Rami, Jupiter and everyone involved in the Meditations project for making this happen. And thanks as always to my wife MC for humoring me while I spent precious evenings & weekends time endlessly debugging my stupid tree. ♡

Addendum : So what about ECS?

You might be wondering why I went straight with the Job System but didn’t use Entities, since they were showcased in the Megacity demo and Unity is really selling it as The Way to do massive amounts of objects with acceptable performance.
I don’t really have a good answer to this, except that I was short on time and was familiar with the idea of data parallelism, but not so much with ECS… and didn’t want to spend time learning how to use ECS properly. And I’m stubborn and will go down a path I’ve set for myself even if it’s a bad idea.

There’s good chances that using ECS is the best way to do what I was trying to achieve, but I didn’t go down that path yet. It would be interesting to revisit the project and do it that way; maybe I will!
I’m also curious to hear from people who have tried Unity’s ECS. Would it really make this easier to design? Would the rendering portion be simplified? Let me know!

Malisse

Malisse Logo

Malisse is a game I made at TOJam “Party like it’s 19TOJam9” in 2014 with Devine Lu Linvega, Rekka B., Dom2D and technobeanie as Les Collégiennes, with sound effects by dualryan.

The game is playable in the web player at its itch.io home : http://renaudbedard.itch.io/malisse

It uses Unity and the whole source code and assets are hosted in a public repository on GitHub, and released under a Creative Commons Attribution license.

Malisse screenshot

The gameplay is a two-player cooperative physics sandbox and puzzle game. The objective for both players is to clear a path for Malisse as she walks on a sinuous path in the world through the looking glass…

A bunch of rabbits trail behind her, but they get scared easily! Everytime Malisse bumps into an object she cannot climb, a rabbit will run away, but you recover one rabbit for every level cleared. If all the rabbits are gone, Malisse ends up alone and … cries herself to death? That’s the end of that play session, anyway!
Otherwise, the levels are chosen randomly from a pool of 11 hastily-authored levels which vary in difficulty. If you get stuck early on your first attempt, definitely give it another shot since you might find more palatable challenges.

It was an interesting game jamming experience for me in many respects : first time with a 5-person team, first time implementing sprite animations in Unity (using 2D Toolkit), and first time writing a tool for use inside the Unity editor — a spline tool for drawing roads quickly. We also had interesting last-minute collision issues, since we wanted Malisse to be able to climb slopes but didn’t want to resort to rigid bodies to have that done automagically. Spherecasting to the rescue, and lots of debugging! ^_^

If you’re wondering, the music was made during the jam by Devine (aka Aliceffekt), based on “When Johnny Comes Marching Home”, because it just fits marching so damn well.

Other than the web player, you can download the OS X and Windows standalone builds.

Enjoy! Had lots of fun building it. Closing with an outstanding band shot of us by Myriame Pilgrim!

LES COLLÉGIENNES

Ogg streaming using OpenTK and NVorbis

August 18th, 2015 Update

This article could be an interesting reference for people trying to understand how you can submit your own buffers to do streaming audio with OpenAL, but the actual tools I’m using (NVorbis, OpenTK) are outdated and I can’t recommend them anymore.

If you’re looking for a modern C# way of doing the same thing, look at how the Song class is implemented with Ogg Vorbis support in Ethan Lee’s FNA library, using Xiph Vorbisfile and the DynamicSoundEffect API, especially if you’re trying to do this in a MonoGame- or XNA-like environment. It’s much faster, the codebase is cut by half, and much less threading pitfalls!

Original article follows…


Updated September 7th 2012 : New OggStream class with better support for concurrent stream playback.

I was looking for a suitable replacement for the audio streaming and compression capabilities of XACT when porting an XNA project to MonoGame, and it doesn’t look like there’s a clear winner yet. MonoGame contributors suggested NAudio, but it looks like work needs to be done to make it portable, and the sample code is a mess. FMod EX or competing commercial solutions are an easy but costly choice. So I turned to OpenAL to see if it can be a free and usable solution for streaming compressed audio with some DSP capabilities.
T’was a bit challenging, but not impossible! :)

Decoding OGGs

Out of the box, OpenAL doesn’t support being fed MP3 or OGG sources. There are extensions for those, but according to one implementation, they’re deprecated. So you need to handle decoding yourself and feed the PCM bitstream to OpenAL.

It sure would be nice to have a purely managed implementation of libVorbis, but it doesn’t exist, so there’s a dozen homemade decoders floating around open source code hubs in various states of workability. I was pointed to NVorbis by TheGrandHero on the TIGSource forums, and I haven’t found a better alternative yet. CsVorbis is another, but it doesn’t support streaming, all the decoding is done up-front, which defeats the purpose. OggSharp is just a fork of CsVorbis with XNA helpers, so nope. TheGrandHero also mentioned trying out DragonOgg but having problems with it.

NVorbis worked like a charm for me, but it’s pretty early and doesn’t support some features like seeking around the stream, so looping or restarting playback requires creating a new whole new reader/decoder. I also took some time to optimize the memory usage in my fork of the project.
07/09/2012 Update : Andrew Ward, the author of NVorbis, resolved the memory allocation problems that the version I forked off had, so I pulled the new changes out instead.

Streaming

Once you have some decoded data, you have to make OpenAL stream it. This is sort of tricky but welldocumented.

(this image shamelessly stolen from Ben Britten’s blog entry linked above)

The basic idea is the following :

  • Generate one OpenAL source for your sound file, like XACT cues
  • Generate 2 or more OpenAL buffers
  • Fill at least one of those with the first samples of the sound and enqueue it/them to the source
  • Start playback of the source; it’ll play all the buffers associated with it, in order
  • In a background thread :
    • Query the source to know whether buffers have already been processed
    • If so, dequeue those buffers, refill them with fresh data and re-enqueue them

In practice, since it involves threads, it’s a bit more obtuse than the pseudo-code, but OpenAL makes it relatively painless. The trick is to read enough data and often enough to avoid buffer underruns.

Then, if you want to loop the sound, it’s not as easy as setting the source’s “Looping” parameter to true, because the buffers never contain the full sound file. Instead of no longer feeding the buffers when you hit the end of the Ogg stream, you just start back at the beginning and feed continuously, which has the nice side-effect of being 100% gapless.

Filters and effects

Finally, I wanted to have one fancy effect that XACT provided : low-pass filtering. This is used extensively in FEZ as a gameplay mechanic, so I could hardly live without it in MonoGame ports.

Thankfully, OpenAL Effect Extensions (EFX) provide cross-platform effects including filters, at least in theory. In reality, this depends on whether the driver implementation supports them, and even the Creative reference Windows implementation doesn’t on my system.

I was able to find a software implementation that does though, OpenAL Soft, and it’s cross-platform, so that bodes well.
To override the installed implementation, just supply the software DLL in the application’s directory and voilà. Had no problems with it up to now, performance or otherwise.

Plus, it comes with a console application that outputs which EFX and other extensions are supported in this implementation. This is handy to detect whether the right DLL’s been used, and helped me figured out that the Creative implementation didn’t support any filter. Here’s what it should say :

Sample class

The result of all of this is a OggStream class that is in my fork of NVorbis on GitHub, which you can find here :

Update : Version 2.0 comes with a sample console application which allows you to test and visualize how different streams get buffered and when buffer underruns occur in a nice concise format. I’m really quite happy about it, give it a shot! Here’s how it looks :

Legend of the symbols that this app blurts out :

  • (* means synchronous buffering (Prepare()) has started, and ) means it ended.
  • . means that one buffer has been refilled with fresh samples
  • | means that there are no more samples to consume from the sound file
  • ! means that playback stopped because of a buffer underrun and had to be restarted
  • { and } represent calls to Start() and Stop()
  • [ and ] represent calls to Pause() and Resume()
  • L, F or f and V or v in prefix means respectively that the stream is looping, fading the low-pass filter in/out or fading volume in/out

My code has only been tested on .NET on Windows, but I don’t see why it wouldn’t work in Mono either.
Like all the unlicensed content on this blog, it’s public domain, but attribution is appreciated.

Cubes All The Way Down @ IGS (GDC)

This again?!

I re-did my slides and my talk at the Independent Games Summit of the GDC 2012. It grew from a measly 42 slides to a healthy 62, so there is more content, many more videos, and incorporates some of the feedback I had about the MIGS version.
Update : it’s on the GDC Vault, (no membership required!) if you want to see me give the presentation.

Without further ado, here are the slides in different formats :

It’s Cubes All The Way Down (PDF format)(PDF with Notes)(PPTX format)

And you can download the associated Videos and songs (179Mb!)

A Replacement for Coroutines in Unity + C#

Coroutines are a great idea and super useful, but they’re kind of unwieldy to use in C# and sometimes they just don’t plain work. Or I don’t know how to use them properly. All I know is that they’re more complicated than they need to be, and I remember having problems using them from an Update method.

So I made my own version of Coroutines inspired by the XNA WaitUntil stuff I posted about a long time ago. Here it is!

using System;
using UnityEngine;
using Debug = UnityEngine.Debug;
using Object = UnityEngine.Object;

class ConditionalBehaviour : MonoBehaviour
{
    public float SinceAlive;

    public Action Action;
    public Condition Condition;

    void Update()
    {
        SinceAlive += Time.deltaTime;
        if (Condition(SinceAlive))
        {
            if (Action != null) Action();
            Destroy(gameObject);
            Action = null;
            Condition = null;
        }
    }
}

public delegate bool Condition(float elapsedSeconds);

public static class Wait
{
    public static void Until(Condition condition, Action action)
    {
        var go = new GameObject("Waiter");
        var w = go.AddComponent<ConditionalBehaviour>();
        w.Condition = condition;
        w.Action = action;
    }
    public static void Until(Condition condition)
    {
        var go = new GameObject("Waiter");
        var w = go.AddComponent<ConditionalBehaviour>();
        w.Condition = condition;
    }
}

Here’s an example of use, straight out of the Volkenessen code (with special guest appearance from my ported easing functions) :

var initialOffset = new Vector3(hitDirection.x * -1, 0, 0);
var origin = armToUse.transform.localPosition;
armToUse.renderer.enabled = true;

Wait.Until(elapsed =>
{
    var step = Easing.EaseOut(1 - Mathf.Clamp01(elapsed / Cooldown), EasingType.Cubic);
    armToUse.transform.localPosition = origin + initialOffset * step;
    return step == 0;
},
() => { armToUse.renderer.enabled = false; });

What’s going on here :

  • You call Wait.Until as a static method and pass it one or two methods (be it lambdas or method references) : The first one is the Condition which gets evaluated every Update until it returns true, and the second gets evaluated when the condition is true (it’s a shorthand, basically)
  • The Wait static class instantiates a “Waiter” game object and hooks a custom script component to it that does the updating and checking stuff
  • The condition gets passed the number of seconds elapsed since the component was created, so you don’t have to keep track of it separately.

I use it for waiting for amounts of time (Wait.Until(elapsed => elapsed > 2, () => { /* Something */ })), interpolate values and do smooth transitions (like the code example above, I animate the player’s arm with it), etc.

I’ll probably keep updating my component as I need more things out of it, but up to now it’s served me well. Hope it helps you too!

Volkenssen – Global Game Jam 2012

Volkenessen is a game I made with Aliceffekt as Les Collégiennes on January 27-29 2012 as part of the 48h Global Game Jam. We actually slept and took the time to eat away from our computer, so based on my estimate we spent at most 30 hours making it!

It’s a two-player, physics-based 2D fighting game. Each player starts with 9 random attached items on his back, and the goal is to strip the other player of his items by beating the crap out of him. When items are removed, they clutter up the playing area, making it even more cahotic and hilarious. The washing machine and sink in the background can also fall and bounce around!

Controls

You need two gamepads (so far the Xbox wired, wireless and a Logitech generic gamepad have been tested and work [you can use the Tattiebogle driver to hook up an Xbox controller to a mac]) to play, there are no keyboard control fallback (yet). The controls are pretty exotic. To move around you can press either the D-Pad (or left analog stick) or the face buttons (A/B/X/Y), and the direction of the button does the same input as if you pressed that D-Pad direction. As you move, your player will throw a punch, kick or flail his ears to make you move as a result.

To hit the other player, you need to get close to him by hitting away from him, then hit him by moving away from him. Ramming into the opponent just doesn’t do it, you need to throw punches, and depending on the impact velocity, even that might not be enough. You can throw double-punches to make sure you land a solid hit and take off an item.

Development

It was made in Unity, with me on C# script and Aliceffekt on every asset including music and sound effects. I see it as one of our most successful jam games; it even won the judge award at our local GGJ space, and it was just so much fun to make, test and play.

I was surprised how well the rigid body physics worked out in the game. I had to use continuous physics on the players and tweak the gravity/mass to get the quick & reactive feel we wanted, but the game was basically playable 6 hours in! After that it was all tweaking the controls, adding visual feedback, determining the endgame condition and coerce the GGJ theme around the game.

I’ll be porting the game to the Arcade Royale in the coming days/weeks, and it should be a blast to play on a real arcade machine :)

Downloads

Windows (32-bit)
Windows (64-bit)
Mac OS X (Universal) 

Enjoy!

Cubes All The Way Down @ MIGS

Back in November 2011, I gave a talk at the Montréal International Game Summit in the Technology track called “Cubes All The Way Down”, where I talked about how FEZ was built, what’s the big modules, the challenges and intricacies of making a tech-heavy indie game from scratch.

It went okay.
I was really stressed, a bit unprepared due to FEZ crunch time, and just generally uncomfortable speaking in front of an audience.
I spoke so fast that I finished 15 minutes early and had 30 minutes for questions, which worked great for me because the relaxed setting of a Q&A session meant better flow, better information delivery, I really liked that part. Also I had friends in the front row that kept asking good questions and were generally supportive, so all in all a good experience. :)

I was asked about giving the slides out, so here they are! Unedited.

It’s Cubes All The Way Down (Powerpoint 2007 PPTX format) (PDF format)

Enjoy!

Encoding boolean flags into a float in HLSL

(this applies to Shader Model 3 and lower)

Hey! I’m still alive!

So, imagine you’re writing a shader instancing shader (sounds redundant, but that’s actually what they are) and you’re trying to pack a lot of data into a float4 or a float4x4 in order to maximize the amount of instances you can render in a single draw call.

My instances had many boolean flags that changed per-instance and that defined how they were lit or rendered. Things like whether or not they are fullbright (100% emissive), texture transform flags (repeating on x or y, more efficient to rebuild the texture matrix than pass it), etc.
Using one float out of your instance data matrix for each boolean is doable, but highly wasteful. A natural way to fit in many flags into an integer is to use a bitfield, but there’s no integer arithmetic in HLSL, and they’re floating point values… how does one proceed?

Here’s how I did it.

Application side

First, this is how I pack my data into floats from the application side (setting the effect parameter) :

int flags = (fullbright ? 1 : 0) | 
	(clampTexture ? 2 : 0) | 
	(xTextureRepeat ? 4 : 0) | 
	(yTextureRepeat ? 8 : 0);

Geometry.Instances[InstanceIndex] = new Matrix(
	p.X, Rotation.X, Scale.X, color.X,
	p.Y, Rotation.Y, Scale.Y, color.Y,
	p.Z, Rotation.Z, Scale.Z, color.Z,
	Animated ? Timing.Step : 0, Rotation.W, flags, Opacity);

Just putting an OR operator between the flags you wanna put, and keep the flag bits powers of two.
Ignore the rest of the matrix contents, they’re just here for show. (in my case : position, rotation, scale, color, opacity, animation frame and the flag collection).

A note on floating point : in a single-precision floating point number as defined by the IEEE, you’ve got 23 bits for the significand. That means you can theoretically put 23 flags in there! That’s a lot of data.
(also, considering the decimal point is floating, you can effectively put much more than 23 bits if some of them are mutually exclusive…!)

Vertex shader

Now in the vertex shader, they get passed to an effect parameter through vertex shader constants, and here’s now the decoding works :

int flags = data[2][3];

bool fullbright = fmod(flags, 2) == 1;
bool clampTexture = fmod(flags, 4) >= 2;
bool xTextureRepeat = fmod(flags, 8) >= 4;
bool yTextureRepeat = fmod(flags, 16) >= 8;

I know my flags reside in the 3rd row, 4th column of my matrix, so I grab ’em from that. Might as well cast them to an integer right now since I won’t be using decimals.

Then I can test for values by testing the remainder of the division of each power-of-two. There is no integer modulo intrinsic function in HLSL for Shader Models 3 and lesser, but the floating-point version works fine.

If I set the first (least significant) bit of a number and divide it by two, the remainder will be 1 if that bit is set. Basically, we test if that number is odd or even; odd means the bit is set.

For every other test, we can test whether the remainder is greater or equal to half the divisor. Effectively, we’re masking the bits greater than the one we’re testing, and testing remaining bits for the presence of the one we’re looking for. Here, if we test for the 3rd bit (from the LSB), so masking with 8 (1000 in binary) and testing against 4 (0100 in binary) :

0000 % 1000 = 0000 // 0 < 4, bit not set
0100 % 1000 = 0100 // 4 >= 4, bit set
1011 % 1000 = 0011 // 3 < 4, bit not set
1110 % 1000 = 0110 // 6 >= 4, bit set
1101 % 1000 = 0101 // 5 >= 4, bit set

Enjoy!

Last.fm Scrobble Fetcher & Mapper

Update May 15th 2016 : New v3.0 build on the GitHub project page with many fixes and additions.

Update August 26th 2010 : New v2.1 build on google code that fixes the “Invalid XML Characters” issue! Try that one if you had errors when fetching scrobbles.

Updated June 26th 2010 : This project is now hosted on Google Code! I’m new to this so bear with me, but I’ll try to make it nice so that people can contribute. (Google Code no longer exists and the project is now on GitHub)

Updated March 5th 2010 : You shouldn’t need to install both iTunes and WMP for it work, just the one you want to use! Finally.

Original March 15th 2009 post follows.

Downloads

Get the freshest releases (source or binaries) on the GitHub project page.

Description

The Last.fm Scrobble Fetcher & Mapper does exactly that. It fetches all your scrobbles from your (or anyone’s, really) Last.fm account, assembles them in terms of Play Count and Date Last Played for each music track, and then exports this data to either Windows Media Player 11 or iTunes.

I’ve been working on this application on and off for some time now and I think it’s ready for deployment. I built it because I have quite an extensive music library, I like my playlists smart and automatic, and I have poor luck with music players, hardware failure and vendor lock-in.

It seems that the “Play Count” and “Date Last Played” metadata fields are not part of a file’s ID3 tags, but rather is stored in the player’s local library. This is usually fine, and probably more efficient than writing to files all the time, but it means that if your player’s database gets corrupted (as happened to me with Windows Media Player) or that you decide/are forced to use another player such as iTunes because your iPhone doesn’t want to sync with anything else, then you’re screwed. And same thing of course if you reinstall your machine or get a new one.

I feel that this metadata is important because I like to have automatic “best-of” playlists that are based upon it, and sometimes it’s nice to listen to a comfortable, time-proven playlist.

Thankfully, if like me you’ve been using the Last.fm services since they were called Audioscrobbler, you’ve gathered an impressive amount of playback information in your account over the years. And using their web services, and my application, now you can take it back home!

Technology

I wanted this application to be my cleanest, most error-tolerant and most efficient piece of work yet in application design. I also tried to exploit all C# 3.5 features, having accumulated some months of experience with LINQ, lambda expressions, etc.

Here’s a rundown of its tech features :

  • Multi-threaded

    • Uses the Parallel Extensions for .NET June 2008 CTP and a little home-made framework for progress-reporting asynchronous foreground tasks.
    • Most operations will use multiple cores thanks to the Task Parallel Library’s capabilities, and will seldom lock because of its lockless concurrent data structures.
  • WCF-enabled

    • Uses the Windows Communication Foundation classes in .NET 3.5 to communicate with Last.fm’s RESTful API.
    • All the response data objects are deserialized automatically from XML using the built-in XmlSerializer.
  • Error tolerant

    • Since Last.fm track data will not always match your library’s perfectly, I used the Levenshtein distance string metric and “neutralized” strings (removes all accentuated characters, symbols, whitespace, etc.) to get accurate matches.
    • Will (should!) recover gracefully from errors, both caused by user input or unexpected conditions. It also allows graceful cancelation of long-running operations.

Screenshots

scrobblemapper9 scrobblemapper8scrobblemapper5 scrobblemapper3

Closing notes

– This code uses a Community Technical Preview version of the Parallel Extensions for .NET, and one that is almost a year old… So it’s delivered as-is, and you cannot (and should not) use that library in commercial products. Although I have functionally tested the program pretty extensively, I cannot guarantee it’s not going to corrupt your library or overwrite some information. Use at your own risk!

– I noticed that iTunes checks if the file is writable before setting any metadata concerning it. So you should make your files writables unless you’ll get a ton of errors in the error log after the scrobble-mapping.

– You need to keep the iTunes instance running for the iTunes mapping to work. The COM interface requires it to be open, but you can minimize it to the tray.

– The code is released under the Creative Commons Attribution-Share Alike 2.5 license.

If you encounter anything unusual, if you have ideas for extensions to this program or have comments/questions about how it works, do ask! That said I will probably blog some more about parts of this program, like the WCF usage or the asynchronous task classes. Enjoy!