Ogg streaming using OpenTK and NVorbis

August 18th, 2015 Update

This article could be an interesting reference for people trying to understand how you can submit your own buffers to do streaming audio with OpenAL, but the actual tools I’m using (NVorbis, OpenTK) are outdated and I can’t recommend them anymore.

If you’re looking for a modern C# way of doing the same thing, look at how the Song class is implemented with Ogg Vorbis support in Ethan Lee’s FNA library, using Xiph Vorbisfile and the DynamicSoundEffect API, especially if you’re trying to do this in a MonoGame- or XNA-like environment. It’s much faster, the codebase is cut by half, and much less threading pitfalls!

Original article follows…


Updated September 7th 2012 : New OggStream class with better support for concurrent stream playback.

I was looking for a suitable replacement for the audio streaming and compression capabilities of XACT when porting an XNA project to MonoGame, and it doesn’t look like there’s a clear winner yet. MonoGame contributors suggested NAudio, but it looks like work needs to be done to make it portable, and the sample code is a mess. FMod EX or competing commercial solutions are an easy but costly choice. So I turned to OpenAL to see if it can be a free and usable solution for streaming compressed audio with some DSP capabilities.
T’was a bit challenging, but not impossible! :)

Decoding OGGs

Out of the box, OpenAL doesn’t support being fed MP3 or OGG sources. There are extensions for those, but according to one implementation, they’re deprecated. So you need to handle decoding yourself and feed the PCM bitstream to OpenAL.

It sure would be nice to have a purely managed implementation of libVorbis, but it doesn’t exist, so there’s a dozen homemade decoders floating around open source code hubs in various states of workability. I was pointed to NVorbis by TheGrandHero on the TIGSource forums, and I haven’t found a better alternative yet. CsVorbis is another, but it doesn’t support streaming, all the decoding is done up-front, which defeats the purpose. OggSharp is just a fork of CsVorbis with XNA helpers, so nope. TheGrandHero also mentioned trying out DragonOgg but having problems with it.

NVorbis worked like a charm for me, but it’s pretty early and doesn’t support some features like seeking around the stream, so looping or restarting playback requires creating a new whole new reader/decoder. I also took some time to optimize the memory usage in my fork of the project.
07/09/2012 Update : Andrew Ward, the author of NVorbis, resolved the memory allocation problems that the version I forked off had, so I pulled the new changes out instead.

Streaming

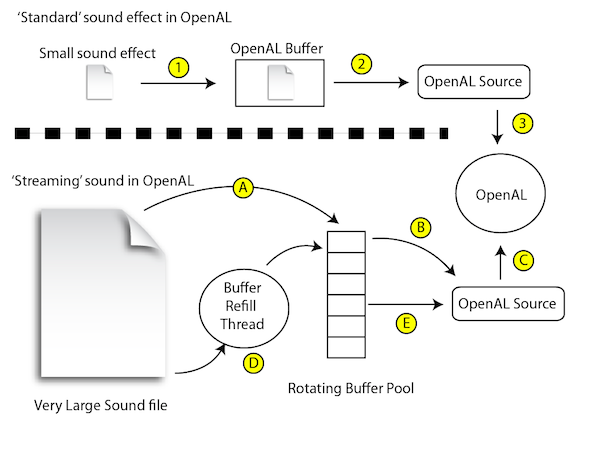
Once you have some decoded data, you have to make OpenAL stream it. This is sort of tricky but welldocumented.

(this image shamelessly stolen from Ben Britten’s blog entry linked above)

The basic idea is the following :

  • Generate one OpenAL source for your sound file, like XACT cues
  • Generate 2 or more OpenAL buffers
  • Fill at least one of those with the first samples of the sound and enqueue it/them to the source
  • Start playback of the source; it’ll play all the buffers associated with it, in order
  • In a background thread :
    • Query the source to know whether buffers have already been processed
    • If so, dequeue those buffers, refill them with fresh data and re-enqueue them

In practice, since it involves threads, it’s a bit more obtuse than the pseudo-code, but OpenAL makes it relatively painless. The trick is to read enough data and often enough to avoid buffer underruns.

Then, if you want to loop the sound, it’s not as easy as setting the source’s “Looping” parameter to true, because the buffers never contain the full sound file. Instead of no longer feeding the buffers when you hit the end of the Ogg stream, you just start back at the beginning and feed continuously, which has the nice side-effect of being 100% gapless.

Filters and effects

Finally, I wanted to have one fancy effect that XACT provided : low-pass filtering. This is used extensively in FEZ as a gameplay mechanic, so I could hardly live without it in MonoGame ports.

Thankfully, OpenAL Effect Extensions (EFX) provide cross-platform effects including filters, at least in theory. In reality, this depends on whether the driver implementation supports them, and even the Creative reference Windows implementation doesn’t on my system.

I was able to find a software implementation that does though, OpenAL Soft, and it’s cross-platform, so that bodes well.
To override the installed implementation, just supply the software DLL in the application’s directory and voilà. Had no problems with it up to now, performance or otherwise.

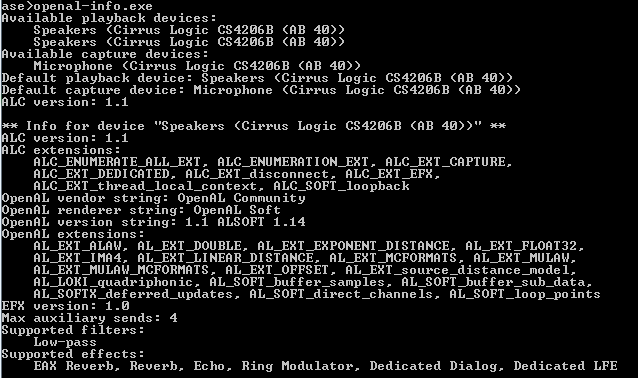
Plus, it comes with a console application that outputs which EFX and other extensions are supported in this implementation. This is handy to detect whether the right DLL’s been used, and helped me figured out that the Creative implementation didn’t support any filter. Here’s what it should say :

Sample class

The result of all of this is a OggStream class that is in my fork of NVorbis on GitHub, which you can find here :

Update : Version 2.0 comes with a sample console application which allows you to test and visualize how different streams get buffered and when buffer underruns occur in a nice concise format. I’m really quite happy about it, give it a shot! Here’s how it looks :

Legend of the symbols that this app blurts out :

  • (* means synchronous buffering (Prepare()) has started, and ) means it ended.
  • . means that one buffer has been refilled with fresh samples
  • | means that there are no more samples to consume from the sound file
  • ! means that playback stopped because of a buffer underrun and had to be restarted
  • { and } represent calls to Start() and Stop()
  • [ and ] represent calls to Pause() and Resume()
  • L, F or f and V or v in prefix means respectively that the stream is looping, fading the low-pass filter in/out or fading volume in/out

My code has only been tested on .NET on Windows, but I don’t see why it wouldn’t work in Mono either.
Like all the unlicensed content on this blog, it’s public domain, but attribution is appreciated.

Wrap texture adressing within a sprite sheet or atlas

FEZ shipped with volume textures (aka 3D textures) for all the sprite animations in the game. Gomez, NPCs and other animated pixel art were all done using those. This was a tech call that I made way back in 2008 and kept with it because it makes more sense than you might think :

  • No need to do texture packing and keeping track of where frames are in the sheet; a volume texture is an ordered list of 3D textures, every frame is a slice!
  • The pixel shader just does a tex3D() call with the Z component of the texture coordinates being the step of the animation between 0 and 1.
  • Cool side-effect : hardware linear interpolation between animation frames! This wasn’t very useful for me (except for one thing, water caustic overlays), but it’s a nice bonus.
  • Mip-mapping with 3D textures is problematic because it downsizes in X, Y and Z, meaning that each mip level halves the number of frames. However, I didn’t need mip mapping at all (for sprites), I never undersample pixel art.
  • Same limitation when making a volume texture power-of-two, it also goes power-of-two in the Z axis which means a lot of blank frames, which is wasteful but not a huge problem to deal with.

But while I haven’t done real testing, one can assume that they’re slower than a regular 2D sprite sheet, and they imply that you have one texture by animation, which restricts how much you can pack things together. Creating a volume texture at load-time with XNA Texture2D.SetData() calls means one call per animation frame, which is noticeably slow. Also, volume textures are not currently supported by MonoGame, and I assume some integrated graphics hardware would have trouble dealing with them.

So the more traditional alternative is using a sprite sheet, which is easy to make using tools like the Sprite Sheet Packer.

But then what if you need to use wrap texture addressing on it, to have horizontally and/or vertically repeating textures?

If you only repeat on one axis, have relatively small textures and a small number of frames, you can force the texture packer to layout the sprites on a single row or column, which allows wrapping on the other axis.

This worked for some animations, but some were just too big or had too many frames to fit it in under 4096 pixels. In that case, there’s one final option : pixel shaders to the rescue!

When addressing the texture in your shader, you’re likely to use a 3×3 texture matrix, or a 4D vector if you’re short on input parameters. Either way, you have four components : UV offset and UV scale. You can use those to manually wrap the texture coordinates on a per-pixel basis. In the sample below, I extract the data from a texture matrix.

Vertex Shader

Out.TextureCoordinates = mul(float3(In.TextureCoordinates, 1), Matrices_Texture).xy;
Out.UVMinimum = Matrices_Texture[2].xy;
Out.UVScale = float2(Matrices_Texture[0][0], Matrices_Texture[1][1]);

Pixel Shader

float2 tc = In.TextureCoordinates;
tc = frac((tc - In.UVMinimum) / In.UVScale) * In.UVScale + In.UVMinimum;
float4 sample = tex2D(AnimatedSampler, tc);

The frac() HLSL intrinsic retains the decimal part of its input, which gives the normalized portion of the texture that the coordinates are supposed to show. Then I remap that to the sprite’s area in the atlas, and sample using those.

I ended up only needing wrapping on one axis for that big texture/animation, but this code does both just in case. This is WAY simpler than customizing the vertex texture coordinates to allow wrapping.
One caveat though, this won’t play well with linear filtering. Since FEZ is pixel art, I could get away with point sampling and had no artifacts there.

P.S. A simple fix to enable usage of linear filtering : pad the sprites with 1 pixel column and rows of the opposite side of the texture! (and don’t include those in the sampled area; it only gets sampled by the interpolator)

Pico Battle

Updated 04/07/2012 : Version 1.1 — see below for patch notes & downloads.

At long last!

Pico Battle is a game I initially made with Aliceffekt for the Prince Of Arcade event of early November 2011, which more than half a year ago. But between FEZ, Volkenessen, Diluvium and Waiting for Horus, we never took the time to actually finish it properly, until now!

In its PoA demo form, it used the same crude networking code as The Cloud Is A Lie, which requires two computers plugged in the same LAN or ideally directly by a cross-wired ethernet cable. Releasing that particular version publicly made little sense, so we decided to make a much more extensive multiplayer version.

Above, Pico Battle 2011 (albeit a terribly compressed and cropped screenshot).
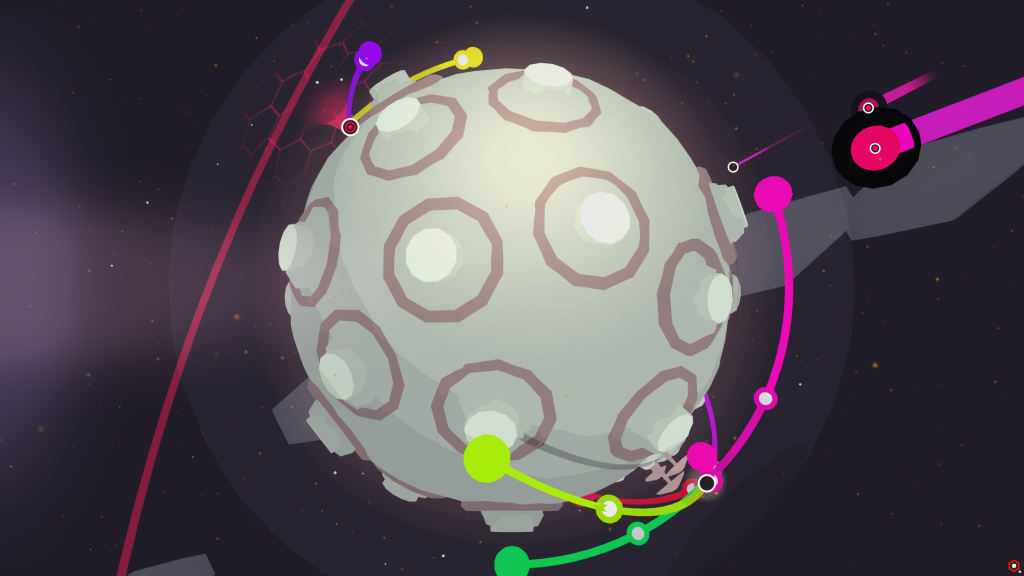
And below, the version we’re releasing! :)

This game’s name might remind you of another Prince of Arcade game, this one in 2010 — Pico³. It’s the same basic idea of playing with colors, mixing and matching them, but this time in a competitive versus environment.

How To Play

Upon launching the game, you will find yourself in the Lobby, a temporary haven. You should look for an hexagon floating about the edges of your screen (right click drag to rotate around the planet) and click on it to practice against the AI. You might see circles too, they are other players and could challenge you as soon as you raise your shield.

To protect yourself against incoming attacks, find the patch of dirt marked by a black & white circle, and connect a node to it. The shield will light up, eating away at the incoming bullets with a similar hue. In the lobby, you are invisible to potential attackers as long as your shield is unpowered.

To win against your opponent, locate a patch of mushrooms and connect nodes to it — this is your cannon. It needs a minimum amount of power to be able to fire, and based on the incoming nodes, will fire bullets of various sizes and colours; easier or harder to defend against. The idea being to match the colour of incoming bullets with your shield, and to differ as much as possible from the opponent’s shield colour (which is indicated by the contour of his circular icon) with your cannon’s bullets.

Pico Battle is an entirely wordless game, and might seem offputting or hard to grasp at first. In the lobby, a robotic voice will explain the basics of the game, and take your time there to experiment with the controls and the scarce UI elements. As you get familiar with the game and its interface, you will discover strategies and enjoy it even more.

Updates

04/07/2012 — Version 1.1

  • Fixed bug where the AI wouldn’t defend itself if it is challenged too quickly
  • AI now raises a random shield before you attack with any colour
  • Fixed graphical issue on arc-link shadows
  • Escape key now quits the game if pressed in the lobby

Downloads

Windows Version – picobattle_pc.zip
Mac OS X Version – picobattle_mac.zip

The soundtrack is available on Aliceffekt’s blog entry for the game.

Diluvium – TOJam 7

Updated 15/06/2012!
See bottom of the post for updated download links.

Diluvium is a game I made with Aliceffekt, Henk Boom and Dom2D as Les Collégiennes over the course of TOJam The Sevening, a 48h game jam (though we had a ~8h headstart on that) which took place between May 11th and 13th 2012.

Gameplay

Diluvium is a versus typing tactics game.
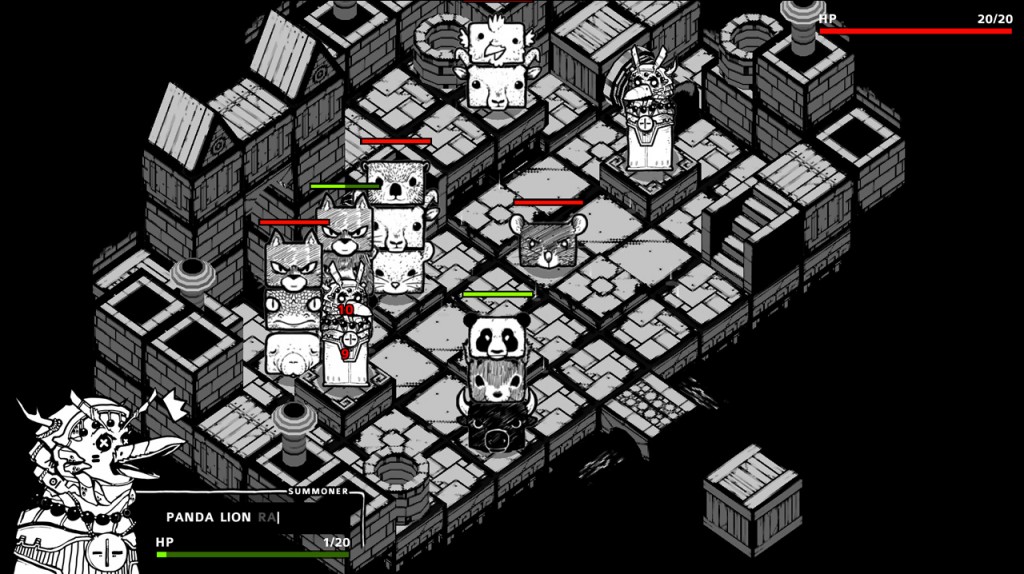
There are two summoners on the battlefield, and you are one of them. Type animal names to summon them, and they will attack the enemy’s spawns and ultimately the enemy summoner himself. The first to kill the other one wins, as these things usually are.

You can type up to three animal names in a row, which spawns a totem of these three animals. Each animal has its own stats : speed, attack power, health and intelligence. The totem is as intelligent as its most intelligent member, and health is summed up, but movement speed is averaged.

If someone spawns a dog on the playfield, nobody can spawn another dog until it dies. No duplicate animal! Thankfully you have 284 animal names to choose from, 100 of which are illustrated differently.

The game has a half-assed single-player mode that you can access by typing “LOCAL” in the connection screen. Otherwise, the game should work fine in LAN and over the Internet, as long as you open up the server’s port 10000 (I’m not sure whether Unity networking uses TCP or UDP, so go for both). The connection screen lets you know your LAN and WAN IPs as you host the game.

Things you can also enter at the connection prompt : “MUTE” to kill the music, “IDDQD” for degreelessness mode, and one other secret code which will be revealed elsewhere on the interwebs!

For more information about the commands you can enter on the splash screen, see Aliceffekt’s wiki page on Diluvium.

Development

This was the second network multiplayer game I’ve worked on that uses actual Unity networking instead of a hacked up UDP sender/receiver pair. It’s SO MUCH EASIER TO SET UP! And it works consistently, no threading bugs and random Unity crashes. Knowing this makes me much more comfortable in attempting more network-multiplayer games in jams. The Cloud Is A Lie was a nightmare to keep synchronized, it would’ve been so much easier with the built-in stuff.

We had sort of an Montréal Indie Superstar version of Les Collégiennes this time at TOJam, with FRACT‘s Henk with me on code and Dom2D as an animal portraits factory for the whole weekend. Aliceffekt and Dom’s visual styles merged really well, and having all this extra super talented manpower allowed us to create a much more ambitious game. Henk happened to have working pathfinding classes just lying around, and his deeper knowledge of Unity intricacies meant less time spent fighting bugs and oddities. It was such a great jam! ^_^

Updates

Version 1.1 – 15/06/2012

  • Server Naming : You can now name your games and tell your friend to connect to it by name instead of IP! (IP still works, though)
  • Anonymatching : Create a server and wait for a user, or join an anonymous server randomly!
  • NAT Punchthrough : Server no longer needs to forward port 10000
  • Adaptative AI : In local mode, AI opponent spawns more/less units per second depending on wins/losses
  • Splash Redesign : Options better presented, no more accidental enter key press
  • Balancing, a handful of new animal names supported
  • Escape key quits to splash at any time during gameplay

Downloads

Diluvium v1.1 – Windows version
Diluvium v1.1 – Mac version

Enjoy!

Cubes All The Way Down @ IGS (GDC)

This again?!

I re-did my slides and my talk at the Independent Games Summit of the GDC 2012. It grew from a measly 42 slides to a healthy 62, so there is more content, many more videos, and incorporates some of the feedback I had about the MIGS version.
Update : it’s on the GDC Vault, (no membership required!) if you want to see me give the presentation.

Without further ado, here are the slides in different formats :

It’s Cubes All The Way Down (PDF format)(PDF with Notes)(PPTX format)

And you can download the associated Videos and songs (179Mb!)

A Replacement for Coroutines in Unity + C#

Coroutines are a great idea and super useful, but they’re kind of unwieldy to use in C# and sometimes they just don’t plain work. Or I don’t know how to use them properly. All I know is that they’re more complicated than they need to be, and I remember having problems using them from an Update method.

So I made my own version of Coroutines inspired by the XNA WaitUntil stuff I posted about a long time ago. Here it is!

using System;
using UnityEngine;
using Debug = UnityEngine.Debug;
using Object = UnityEngine.Object;

class ConditionalBehaviour : MonoBehaviour
{
    public float SinceAlive;

    public Action Action;
    public Condition Condition;

    void Update()
    {
        SinceAlive += Time.deltaTime;
        if (Condition(SinceAlive))
        {
            if (Action != null) Action();
            Destroy(gameObject);
            Action = null;
            Condition = null;
        }
    }
}

public delegate bool Condition(float elapsedSeconds);

public static class Wait
{
    public static void Until(Condition condition, Action action)
    {
        var go = new GameObject("Waiter");
        var w = go.AddComponent<ConditionalBehaviour>();
        w.Condition = condition;
        w.Action = action;
    }
    public static void Until(Condition condition)
    {
        var go = new GameObject("Waiter");
        var w = go.AddComponent<ConditionalBehaviour>();
        w.Condition = condition;
    }
}

Here’s an example of use, straight out of the Volkenessen code (with special guest appearance from my ported easing functions) :

var initialOffset = new Vector3(hitDirection.x * -1, 0, 0);
var origin = armToUse.transform.localPosition;
armToUse.renderer.enabled = true;

Wait.Until(elapsed =>
{
    var step = Easing.EaseOut(1 - Mathf.Clamp01(elapsed / Cooldown), EasingType.Cubic);
    armToUse.transform.localPosition = origin + initialOffset * step;
    return step == 0;
},
() => { armToUse.renderer.enabled = false; });

What’s going on here :

  • You call Wait.Until as a static method and pass it one or two methods (be it lambdas or method references) : The first one is the Condition which gets evaluated every Update until it returns true, and the second gets evaluated when the condition is true (it’s a shorthand, basically)
  • The Wait static class instantiates a “Waiter” game object and hooks a custom script component to it that does the updating and checking stuff
  • The condition gets passed the number of seconds elapsed since the component was created, so you don’t have to keep track of it separately.

I use it for waiting for amounts of time (Wait.Until(elapsed => elapsed > 2, () => { /* Something */ })), interpolate values and do smooth transitions (like the code example above, I animate the player’s arm with it), etc.

I’ll probably keep updating my component as I need more things out of it, but up to now it’s served me well. Hope it helps you too!

Volkenssen – Global Game Jam 2012

Volkenessen is a game I made with Aliceffekt as Les Collégiennes on January 27-29 2012 as part of the 48h Global Game Jam. We actually slept and took the time to eat away from our computer, so based on my estimate we spent at most 30 hours making it!

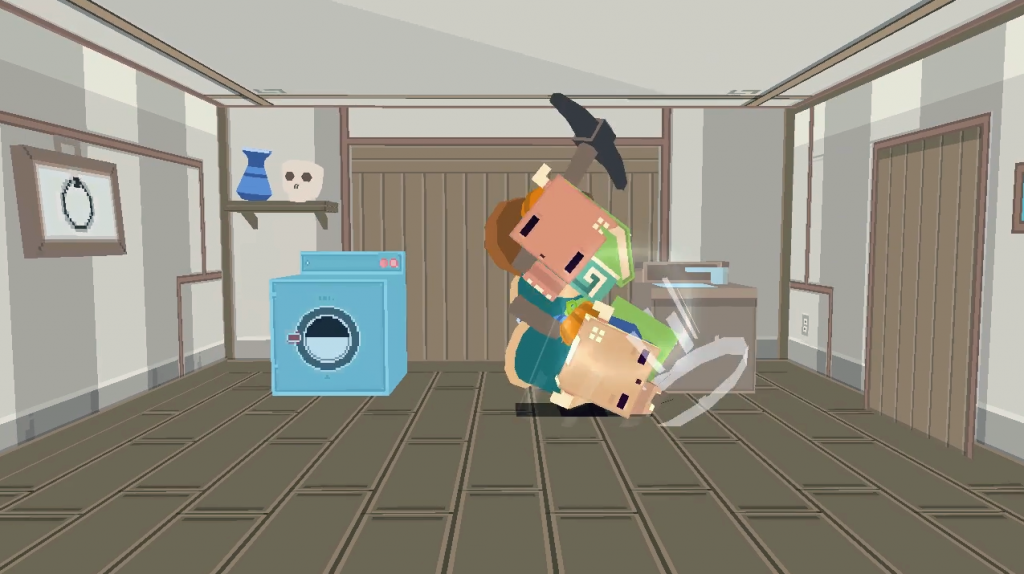
It’s a two-player, physics-based 2D fighting game. Each player starts with 9 random attached items on his back, and the goal is to strip the other player of his items by beating the crap out of him. When items are removed, they clutter up the playing area, making it even more cahotic and hilarious. The washing machine and sink in the background can also fall and bounce around!

Controls

You need two gamepads (so far the Xbox wired, wireless and a Logitech generic gamepad have been tested and work [you can use the Tattiebogle driver to hook up an Xbox controller to a mac]) to play, there are no keyboard control fallback (yet). The controls are pretty exotic. To move around you can press either the D-Pad (or left analog stick) or the face buttons (A/B/X/Y), and the direction of the button does the same input as if you pressed that D-Pad direction. As you move, your player will throw a punch, kick or flail his ears to make you move as a result.

To hit the other player, you need to get close to him by hitting away from him, then hit him by moving away from him. Ramming into the opponent just doesn’t do it, you need to throw punches, and depending on the impact velocity, even that might not be enough. You can throw double-punches to make sure you land a solid hit and take off an item.

Development

It was made in Unity, with me on C# script and Aliceffekt on every asset including music and sound effects. I see it as one of our most successful jam games; it even won the judge award at our local GGJ space, and it was just so much fun to make, test and play.

I was surprised how well the rigid body physics worked out in the game. I had to use continuous physics on the players and tweak the gravity/mass to get the quick & reactive feel we wanted, but the game was basically playable 6 hours in! After that it was all tweaking the controls, adding visual feedback, determining the endgame condition and coerce the GGJ theme around the game.

I’ll be porting the game to the Arcade Royale in the coming days/weeks, and it should be a blast to play on a real arcade machine :)

Downloads

Windows (32-bit)
Windows (64-bit)
Mac OS X (Universal) 

Enjoy!

Cubes All The Way Down @ MIGS

Back in November 2011, I gave a talk at the Montréal International Game Summit in the Technology track called “Cubes All The Way Down”, where I talked about how FEZ was built, what’s the big modules, the challenges and intricacies of making a tech-heavy indie game from scratch.

It went okay.
I was really stressed, a bit unprepared due to FEZ crunch time, and just generally uncomfortable speaking in front of an audience.
I spoke so fast that I finished 15 minutes early and had 30 minutes for questions, which worked great for me because the relaxed setting of a Q&A session meant better flow, better information delivery, I really liked that part. Also I had friends in the front row that kept asking good questions and were generally supportive, so all in all a good experience. :)

I was asked about giving the slides out, so here they are! Unedited.

It’s Cubes All The Way Down (Powerpoint 2007 PPTX format) (PDF format)

Enjoy!

Encoding boolean flags into a float in HLSL

(this applies to Shader Model 3 and lower)

Hey! I’m still alive!

So, imagine you’re writing a shader instancing shader (sounds redundant, but that’s actually what they are) and you’re trying to pack a lot of data into a float4 or a float4x4 in order to maximize the amount of instances you can render in a single draw call.

My instances had many boolean flags that changed per-instance and that defined how they were lit or rendered. Things like whether or not they are fullbright (100% emissive), texture transform flags (repeating on x or y, more efficient to rebuild the texture matrix than pass it), etc.
Using one float out of your instance data matrix for each boolean is doable, but highly wasteful. A natural way to fit in many flags into an integer is to use a bitfield, but there’s no integer arithmetic in HLSL, and they’re floating point values… how does one proceed?

Here’s how I did it.

Application side

First, this is how I pack my data into floats from the application side (setting the effect parameter) :

int flags = (fullbright ? 1 : 0) | 
	(clampTexture ? 2 : 0) | 
	(xTextureRepeat ? 4 : 0) | 
	(yTextureRepeat ? 8 : 0);

Geometry.Instances[InstanceIndex] = new Matrix(
	p.X, Rotation.X, Scale.X, color.X,
	p.Y, Rotation.Y, Scale.Y, color.Y,
	p.Z, Rotation.Z, Scale.Z, color.Z,
	Animated ? Timing.Step : 0, Rotation.W, flags, Opacity);

Just putting an OR operator between the flags you wanna put, and keep the flag bits powers of two.
Ignore the rest of the matrix contents, they’re just here for show. (in my case : position, rotation, scale, color, opacity, animation frame and the flag collection).

A note on floating point : in a single-precision floating point number as defined by the IEEE, you’ve got 23 bits for the significand. That means you can theoretically put 23 flags in there! That’s a lot of data.
(also, considering the decimal point is floating, you can effectively put much more than 23 bits if some of them are mutually exclusive…!)

Vertex shader

Now in the vertex shader, they get passed to an effect parameter through vertex shader constants, and here’s now the decoding works :

int flags = data[2][3];

bool fullbright = fmod(flags, 2) == 1;
bool clampTexture = fmod(flags, 4) >= 2;
bool xTextureRepeat = fmod(flags, 8) >= 4;
bool yTextureRepeat = fmod(flags, 16) >= 8;

I know my flags reside in the 3rd row, 4th column of my matrix, so I grab ’em from that. Might as well cast them to an integer right now since I won’t be using decimals.

Then I can test for values by testing the remainder of the division of each power-of-two. There is no integer modulo intrinsic function in HLSL for Shader Models 3 and lesser, but the floating-point version works fine.

If I set the first (least significant) bit of a number and divide it by two, the remainder will be 1 if that bit is set. Basically, we test if that number is odd or even; odd means the bit is set.

For every other test, we can test whether the remainder is greater or equal to half the divisor. Effectively, we’re masking the bits greater than the one we’re testing, and testing remaining bits for the presence of the one we’re looking for. Here, if we test for the 3rd bit (from the LSB), so masking with 8 (1000 in binary) and testing against 4 (0100 in binary) :

0000 % 1000 = 0000 // 0 < 4, bit not set
0100 % 1000 = 0100 // 4 >= 4, bit set
1011 % 1000 = 0011 // 3 < 4, bit not set
1110 % 1000 = 0110 // 6 >= 4, bit set
1101 % 1000 = 0101 // 5 >= 4, bit set

Enjoy!

Pax Britannica

Even though the game’s been out for a long while and even has an official page, I’ve never made a post about it, and now that we’ve been elected #3 Free Indie Game of 2010 on Bytejacker (!!!), now seems like a good time to spread the word!

Multiplayer underwater mayhem!

We originally made the game for Gamma IV earlier this year, and released a Windows version when the competition ended, but recently we went back and finished up the Mac and Linux versions. It’s great that porting the game didn’t involve touching any of the game code (which is in Lua, and MIT-licensed).

So whatever platform you’re running on, try the game out! It’s great fun in multiplayer, and the learning curve is almost inexistent.

All the latest versions are downloadable on the official site, http://paxbritannica.henk.ca/.