Post Processing/Fullscreen Texture Sampling

I’ve decided to repost all my remaining TV3D 6.5 samples to this blog (until I get bored). These are not new, but they were only downloadable from the TV3D forums until now!

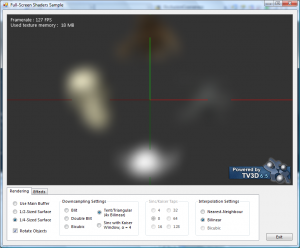
This demo (originally released July 1st 2008 here) is a mixed bag of many techniques I wanted to demonstrate at once. It contains (all of which are described below) :

  • Pixel-perfect sampling of mainbuffer rendersurfaces for post-processing
  • A component/service system very similar to XNA’s and with support for IoC service injection
  • A minimally invasive, memory-conserving workflow for post-processing shaders
  • Many realtime surface downsampling methods (blit, blit 2x, tent, sinc+kaiser and bicubic)
  • An optimized Gaussian blur shader with up to 17 effective taps in a single pass

Download

FullscreenShaders_(final).zip [8.6 Mb] – C#3 (VS.NET 2008, TV3D 6.5 Prerelease .NET DLL Required)

Screenshots

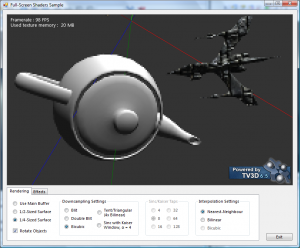
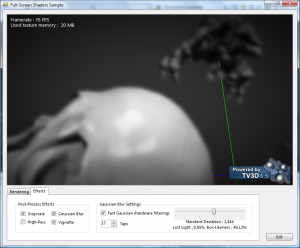
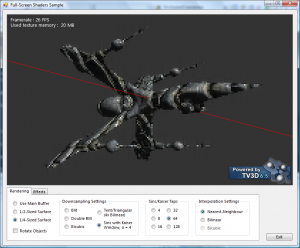
fs1fs2fs3fs4

Dissection

Pixel-Perfect Sampling

There is a well-known oddity in all DirectX versions (I think I’ve read somewhere that DX11 fixes it… amazing!) that when drawing a fullscreen textured quad, the texture coordinates need to be shifted by a half-texel. So that’s why if you use hardware filtering (which is typically enabled by default), all your fullscreen quads are slightly blurred.
But the half texel offset is related to the texel size of the texture you are sampling, as well as the viewport to which you are rendering! And it gets seriously wierd when you’re downsampling (sampling a texture at a lower frequency than its resolution), or when you’re sampling different-sized textures in a single render pass…

So this demo adresses the simple cases. I very recently found a more proper way to address this problem in a 2003 post from Simon Brown. I tested it and it works, but I don’t feel like updating the demo. ^_^

Component System

The component system was re-used in Trouble In Euclidea and Super HYPERCUBE, and I’m currently using it to prototype a culling system that uses hardware occlusion queries efficiently. The version bundled with this demo is slightly out of date, but very functional.
I blogged about the service injection idea a long time ago, if you want to read up on it.

Post-processing that just sits on top

This is how I consider post-processing should be done : using the main buffer directly without writing to a rendersurface to begin with. This way, the natural rendering flow is not disturbed, and post-processing effects are just plugged after the rendering is done.

If you can work directly with the main buffer (no downscaling beforehand), you can grab the mainbuffer onto a temporary rendersurface using BltFromMainBuffer() after all draw calls are performed, and call Draw_FullscreenQuadWithShader() using the temporary rendersurface as a texture. The post-processed result is output right on the main-buffer.
Any number of effects can be chained this way… blit, draw, blit, draw. Since the RS usage only lasts until the fullscreen draw call, you can re-use the same RS over and over again.

If you want to scale the main buffer down before applying your effect (e.g. for performance reasons, or to widen the effect of a blur), then you’ll need to work “one frame late”. I described how this works in this TV3D forum post.

Downsampling Techniques

The techniques I implemented for downsampling are the following :

  • Blit : Simply uses BltFromRenderSurface onto a half- or quarter-sized rendersurface. A single-shot 4x downscale causes sampling issues because it ignores half of the source texels… but it’s fast!
  • Double blit : 4x downscaling via two successive blits, each recieving surface being half as big as the source. It has less artifacts and is still reasonably fast.
  • Bicubic : A more detail-conserving two-pass filter for downsampling that uses 4 linear taps for 2x downsampling, or 8 linear taps for 4x. Works great in 2x, but I’m not sure if the result is accurate in 4x. (reference document, parts of it like the bits about interpolation/upsampling are BS but it worked to an extent)
  • Tent/Triangular/Bilinear 4x : I wasn’t sure of its exact name because it’s shaped in 2D like a tent, in 1D like a triangle, and it’s exactly the same as bilinear filtering… It’s accurate but detail-murdering 4x downsampling. Theoretically, it should produce the same result as a “double blit”, but the tent is a lot more stable, which shows that BlitFromRenderSurface has sampling problems.
  • Sinc with Kaiser window : A silly and time-consuming experiment that pretty much failed. I found out about this filter in a technical column by the Jonathan Blow (of Braid fame), which mentioned that it is the perfect low-pass filter and should be the most detail-conserving downsampling filter. There are very convincing experimental results in part 2 as well, so I gave it a shot. I get a lot of rippling artifacts, it’s way too slow for realtime, but it’s been fun to try out. (reference document)

Fast Gaussian Blur + Metrics

The gaussian blur shader (and its accompanying classes) in this demo an implementation of the stuff I blogged about some months ago : the link between “lost light” in the weights calculation and how similar to a box-filter it becomes. You can change the kernel size dynamically and it’ll tell you how box-similar it is. The calculation for this box-similarity factor is still very arbitrary and you should take it with a grain of salt… but it’s a metric, an indicator.

But there’s something else : hardware filtering! I read about this technique in a GLSL Bloom tutorial by Philip Rideout, and it allows up to 17 effective horizontal and vertical samples in a ps_2_0 (SM2 compatible) pixel shader… resulting in 289 effective samples and a very wide blur! It speeds up 7-tap and 9-tap filters nicely too, by reducing the number of actual samples and instructions.
Phillip’s tutorial contains all the details, but the idea is to sample in-between taps using interpolated weights and achieve the same visual effect even if the sample count is halved. Very ingenious!


If you have more questions, I’ll be glad to answer them in comments.
Otherwise I’ll direct you to the original TV3D forum post for info on its development… there’s a link to a simpler earlier version of the demo there, too.
Gaussian Blur Revisited, part two

First part can be found here.
An implementation of the concepts presented in this series can be found here.

The Perfect Sigma

The last post’s closing note was, how are we to find the “perfect” standard deviation for a fixed number of taps such that exactly 0% of light is lost. This means that the sum of all taps is exactly equal to 1.

It’s absolutely possible, but to find this exact σ with algebra and possibly calculus was a bit over my head. So I just “binary-searched” across the decimals until my Excel grid told me that as long as double-precision goes (15 significant numbers), I have ≈ 1 as the sum. I ended up with the following numbers :

  • 17-tap : 1.2086
  • 15-tap : 1.1402108
  • 13-tap : 1.067359295
  • 11-tap : 0.9890249035
  • 9-tap : 0.90372907227
  • 7-tap : 0.809171316279
  • 5-tap : 0.7013915463849

17-taps per pass, so basically 289 effective texture samples (actually 34…), and a standard deviation of 1.2?! This is what it looks like, original on right, blurred on left :


So my first thought was, “This can’t be right.”

Good Enough

In my first demo, I used a σ = 2.7 for 9 taps, and it didn’t look that bad.
So this got me thinking, how “boxy” can the Gaussian become for it to still look believable? Or, differently put, how much light can we lose before getting a Box-like filter?

To determine that, I needed a metric, a scale. I decided to use the Mean Difference, a.k.a. Average Deviation.
A Box filter does not vary, it’s constant, so its mean difference is always 0. By calculating how low my Gaussian approximations’ mean difference goes, one can find how similar it really is to a Box filter.

The upper limit (0% box-filter-similarity) would be the mean difference of a filter that loses no light at all, and the lower limit (100% similarity) would be equal to a box filter at (again) 15 significant decimal numbers.

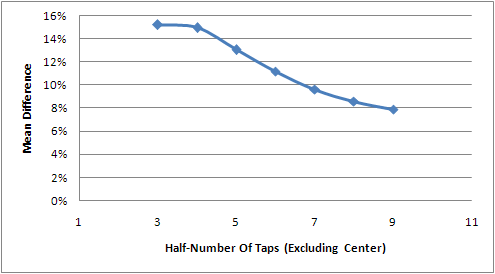
So I fired up Excel and made those calculations. It turns out that at 0% lost light, the mean difference is not linear with the number of taps. In fact, the shape highly resembles a bell curve :

I fitted this curve to a 4th order polynomial (which seemed to fit best in the graph) and at most, I got a 0.74% similarity for 0% lost light, in a 9-tap filter. I’m not looking for something perfect since this metric will be used for visual comparison; the whole process is highly subjective.

Eye Exam

Time to test an implementation and determine how much similarity is too much to this blogger’s eye.
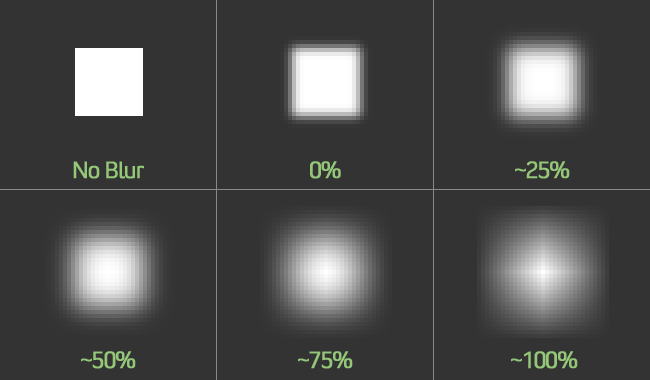
Here’s a fairly tiny 17×17 white square on a dark grey background, blurred with a 17-tap filter of varying σ and blown up 4 times with nearest-neighbour interpolation :

The percentage is my “box-likeness” or “box filter similarity” calculation described in the last section.

Up to 50%, I’m quite pleased with the results. The blurred halo feels very round and neat, with no box limit that cuts off the values harshly. But at 75%, it starts to look seriously boxy. In fact, anything bigger than 60% visibly cuts the blur off. And at 100%, it definitely doesn’t look like a Gaussian, more like a star with a boxy, diamond-shaped blur.

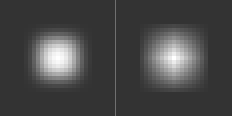
Here’s how 60% and 100% respectively look at a 9-tap, for comparison :

50% looks a liiiiiitle bit rounder, but 60% is still very acceptable and provide a nice blurring capability boost.

Conclusion

My conclusion, like my analysis, is extremely subjective…
I recommend not using more than 60% box-similarity (as calculated with my approach) to keep a good-looking Gaussian blur, and not more than 50% if your scene has very sharp contrasts/angles and you want optimal image quality.

The ideal case of 0% lost light is numerically perfect, but really unpractical in the real world. It feels like a waste of GPU cycles, and I don’t see any reason to limit ourselves to such low σ values.

Here’s a list of 50% and 60% standard deviations for all the tap counts that I consider practical for real-time shaders :

  • 17-tap : 3.66 – 4.95
  • 15-tap : 2.85 – 3.34
  • 13-tap : 2.49 – 2.95
  • 11-tap : 2.18 – 2.54
  • 9-tap : 1.8 – 2.12
  • 7-tap : 1.55 – 1.78
  • 5-tap : 1.35 – 1.54

And last but not least, the Excel document (made with 2007 but saved as 2003 format) that I used to make this article : Gaussian Blur.xls

I hope you’ll find this useful! Me, I think I’m done with the Gaussian. :D

Gaussian Blur Revisited, part one

Second part can be found here.
An implementation of the concepts presented in this series can be found here.

A long time ago, in a blog not so far away, I studied how the Gaussian distribution worked to implement a Gaussian Blur HLSL shader. That worked pretty well, I learned a lot of stuff, and managed to make a very functional shader. But some problems were overlooked and fixed with not-so-scientific solutions/hacks. Last week and this week, I spent more time thinking and experimenting with Gaussian blur weights, and discovered some pretty interesting stuff.

Losing Light

The first problem that I mention in my original post is the fact that when passing any image through a Gaussian blur shader darkens it, a certain portion of brightness or “light” is lost in the process.
Usually, the Gaussian function (a.k.a. the bell curve or normal distribution) has an integral between from x = -∞ to +∞ of exactly 1. But when you sample it at discrete intervals, you always lose a certain portion of that full integral.
To prevent this effect, I decided to “normalize” all the weights (a weight being a sample of the G(x) function at some x distance) to have a sum of exactly one, since that’s what I want to end up with anyway. This works, and my filtered images are bright again.
But doing so has a subtle yet perverse effect to it.

Boxing the Gaussian

Let’s take a 5-tap uni-dimensional kernel with a standard deviation of σ = 1. As a reminder, the standard deviation defines how wide the function is, and how much blurring is performed, and the “tap” count is the number of texture samples done in a single pass (each pass being either horizontal or vertical).
Here are the weights acquired from the function, then the normalized weights (since the function is reflective at x = 0, I only show values for [0, 2]) :

0.39894228, 0.241970725, 0.053990967
Σ = 0.990865662

0.402619947, 0.244201342, 0.054488685
Σ = 1

That looks quite fine. Now let’s use a wider σ of 5.

0.079788456, 0.078208539, 0.073654028
Σ = 0.38351359

0.208045968, 0.203926382, 0.192050634
Σ = 1

Notice how the normalized weights are very close to each other. In fact, it highly resembles an averaging 5-tap Box filter :

0.2, 0.2, 0.2
Σ = 1

When you think about it’s it very natural for this effect to occur. The bigger the standard deviation, the closer to the curve’s apex you sample values, and the lower the apex as well. So the difference between the samples is smaller and you go closer to a straight line.
In fact, at σ = ∞, any normalized Gaussian kernel becomes a Box filter. I don’t have a formal proof for that, but it’s clearly visible, and with single-precision floats it takes a lot less than the infinity.

Visual Difference

Now why is it so bad to use a box filter? It’s as wide as our kernel can get with its limited number of taps after all…

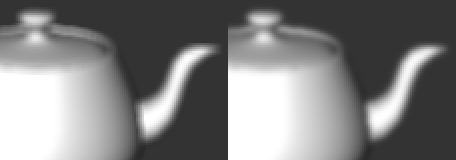
Here’s a visual comparison of the same scene under a 5-tap Box filter and a Gaussian with σ ≈ 1.5, giving it about the same span. It’s not an apples-to-apples comparison, but it should give you an idea.

Comparison shot 1

Comparison shot 2

A Box filter is quite unlike a Gaussian blur. Sharp edges get blocky and it gives a more “sharp” feel than the Gaussian. So it’s definitely not optimal.

Ye Olde Cliffhanger

Getting late here, so I’ll wrap this up.
The question left is this one : At which standard deviation does our Gaussian sampling lose 0% brightness/light for a fixed number of taps? Is that even possible?
Why, yes, yes it is. I’ll keep this for part two!

Bloom

Downloads

Bloom.rar [10mb] – C# 2.0 (VS.NET 2005)

Description

After seeing a couple of people using nVidia’s Bloom shader and be dissatisfied with its looks and perfomance, and more importantly because my employer asked me to do it, I made a Bloom shader from scratch.
It is highly customizable, supports FSAA and supports Pixel Shaders 2.0 up to 3.0.

Continue reading Bloom

Gaussian Blur Experiments

A follow-up to this article with clarifications and corrections to the “real-world considerations” can be found here.

I researched gaussian blur while trying to smooth my Variance Shadow Maps (for the Shadow Mapping sample) and made a pretty handy reference that some might like… I figure I’d post it for my first “Tips” blog post. :)

The full article contains a TV3D 6.5 sample with optimized Gaussian Blur and Downsampling shaders, and shows how to use them properly in TV3D. The article also contains an Excel reference sheet on how to calculate gaussian weights.

Update : I added a section about tap weight maximization (which gives an equal luminance to all blur modes) and optimal standard deviation calculation.

Continue reading Gaussian Blur Experiments

Soft Stencil Shadows

Downloads

SoftStencils.rar [776Kb] – C# 2.0 (VS.NET 2005)

Description

This demo demonstrates a technique that fellow forum user kTech proposed in the Beta Discussion forum to smooth otherwise hard stencil shadows. It uses screen-space blur of the shadow pass to smoothen things out.

Continue reading Soft Stencil Shadows