Point Source Energy Decay

When playing with explosions, I was trying to determine how much an explosion’s energy or force is lost as you move away from the source. After Googling a bit, I found out that as per Coulomb’s Law (which relates more to electric forces, but makes sense for pretty much any point energy source), the energy is inversely proportional to the square of the distance. Kudos to Matthew for helping me find that information.

I intuitively knew that this made sense, probably seen it in other places… but I couldn’t explain it. Why 1 / d²?

After thinking a bit more about it, I managed to pull off a simple yet formal proof to this for any point energy source like sound and light… and explosions!

Circles on the water

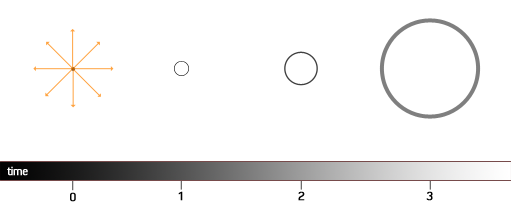
You have to imagine an infinitely small, even null-sized energy source, like a point light in graphics programming. This point energy source emits energy in all directions equally. So let’s say it emits a single pulse at 0-time.

This source emits a 3D sphere around it, which is very dense and concentrated at first (infinitely dense at t=0) but the same energy spreads and becomes less and less dense. This energy “density” defines how much actually hits a surface or object at any distance.

The energy “particles” (that doesn’t sound right, but it’s conceptual) that form that expanding ring are traveling away from the center at constant speed, we’re assuming no friction or resistance in the surrounding medium. It’s a vacuum.

We know that the area of a sphere’s surface is 4πr², where r is the radius of that sphere. Let’s calculate its area at different times, considering that it grows in radius linearly through time :

t0 : r = 0, a = 0
t1 : r = 1, a = 4π
t2 : r = 2, a = 16π
t3 : r = 3, a = 36π

ti : r = i, a = 4πi

So, now that we know the area, I ask the question : How much “energy density” is contained in one square unit of that sphere’s surface at any given time?

Simply put, that’s the inverse of its area. Since we know that the entire area contains all the initial pulse’s energy, one square unit divided by this entire area corresponds to the amount of energy it contains.

And we want to remove all units here, so let’s calculate the ratio to the size at t=1. That gives… :

t0 : a’ = +∞, ratio = +∞
t1 : a’ = 1/4π, ratio = 1
t2 : a’ = 1/16π, ratio = 1/4
t3 : a’ = 1/36π, ratio = 1/9

ti : a’ = 1/4πi, ratio = 1/i²

There you have it. The amount of energy at time t and an equal distance, is the inverse of the square of that value. That is to say… 1 / d²!

I rest my case. :D

Loop Parallelism in a Game Context

An update to this post is available here.

Recently I was coding some physics-enabled particle systems and ended up with some fairly CPU-intensive stuff that looped as times as there are active particles in a system, and as many as there are active particle systems, each update cycle.

And it got choppy.

I don’t like choppy.

So I had three choices :

  • Offload to the GPU using GPGPU or Vertex Textures, but doing that in XNA with Shader Model 2 support is… time-consuming. Especially when you have no background work on the subject.
  • Profile and optimize my physics code, or switch to a physics package like Havok or Farseer, but I expect that would also take too much time.
  • Multithread using loop parallelism to use 100% of my CPU power instead of 50%! (I have a Core 2 Duo processor, and there’s more and more mainstream PCs with dual-, quad- and even octo-cores)

I ended up doing the latter because it was the simplest, and multithreading is rarely ever simple. But in some specific cases, it’s not much of a headache, really.

If your looped operation does not change the context of further loops, that is if every loop can be done in any order and individually without any write locking, it takes like 30 minutes to get it to work in C#, and with no concurrency problems. It’s like offloading static Web content to a different server, just a matter of routing to the right hardware.

Annoyances and interrogations

  • ParameterizedThreadStart is not generic. If you have to pass a context to your threaded operation, you have to cast it back to what it really is, at each iteration. It’s unnecessary and annoying… is it slow?
  • Once a thread dies, you can’t resurrect it. Correct me if I’m wrong, but FSM knows I’ve tried, and a thread that finished its execution cannot be re-run, even if its thread-start method is the same. You have to instantiate another. Does that affect performance…?

The problem with thread creation is that I create a lot of temporary threads. They live a single update cycle, and I instantiate one per particle system per update cycle, at about 60 cycles per second. It sounds like it could slow things down.

So I made a test!

Benchmark

The (fictional) situation is the following : in the middle of a game loop, you have to evaluate the 0th Order Modified Bessel Function Of The First Kind for some reason. And you need to do that for a large dataset, say 500 times per update cycle.

Actually, this kinda makes sense if you’re calculating weights for a very wide Kaiser filter, which I will probably cover later. I had code laying around, which is why I used the elegantly-named Bessel function.

So, this is slow, because it’s an integral. And so multi-threading would be beneficial. The different strategies are :

  • Single-Threading; it’s always good to know how slow it went before all optimization… if only for programmer ego.
  • Multi-Threading, using the ParameterizedThreadStart delegate, which means we’ll have to cast the Object to our real context type.
  • Multi-Threading, using a class-local, strongly-typed context and the (parameterless) ThreadStart delegate. This way we avoid the cast, and sacrifice a weird variable in the host class’ header.
  • Multi-Threading, using a generic Thread wrapper that does the strongly-typed context caching instead of laying it around. It’s basically a proxy for Thread with the context variable.
  • Multi-Threading, using a single “kept-alive” Thread that is started once for all update cycles, and that is forced into an artificial idle state between update cycles.

I hoped, even half-expected that these solutions would go from slowest to fastest. The last one was particularly interesting because it skipped all the thread instantiations and instead, relies on a Monitor and a sync-lock object to “wait” between two update cycles. It also produces much less garbage.

Results

Here’s the result for 500 update cycles, in which I update a 500-sized data-set, in Release mode, out of the IDE so without any debugging, and as little stuff as possible running in the background. I used a Stopwatch object to calculate these timings.

Test ‘Single-Threaded’ Started… Completed.
Time Elapsed : 27.8970399 s

Test ‘Multi-Threaded, ParameterizedThreadStart’ Started… Completed.
Time Elapsed : 18.1804179 s

Test ‘Multi-Threaded, Class-Local Context’ Started… Completed.
Time Elapsed : 19.5161083 s

Test ‘Multi-Threaded, Generic Context’ Started… Completed.
Time Elapsed : 20.2257278 s

Test ‘Multi-Threaded, Kept-Alive Thread’ Started… Completed.
Time Elapsed : 23.7845815 s

Of course, everything goes differently from what I expected. :P

The good news is, thread creation in .NET is very fast. No need to worry about that anymore. In fact, trying to circumvent that using a single kept-alive thread and monitor use makes it go almost 30% slower!

Also, casting the object context every iteration is faster than any other strongly-typed alternative. Unless the word “Object” in your code makes you want to shoot someone, it’s the best way to go. Kind of sad, that.

Here’s the C#3.0 (VS.NET 2008) test project : Loop Threading Performance (24 Kb)

Sorry again for the absolute absence of comments, it’s late and I don’t feel like it. D:

A Note On Debugging

One thing that’s slightly alarming and certainly worth mentioning, is that the performance in the IDE (with Debugging, but not necessarily in “Debug” mode) is hugely different.

In debugging, the “kept-alive” thread is almost always faster than all other strategies, by as much as 15%. This never replicates in the real-world. So kids, always test out of the IDE, or add the empty green arrow (Start Without Debugging, Ctrl+F5) in your Visual Studio toolbar!

Gaussian Blur Revisited, part two

First part can be found here.
An implementation of the concepts presented in this series can be found here.

The Perfect Sigma

The last post’s closing note was, how are we to find the “perfect” standard deviation for a fixed number of taps such that exactly 0% of light is lost. This means that the sum of all taps is exactly equal to 1.

It’s absolutely possible, but to find this exact σ with algebra and possibly calculus was a bit over my head. So I just “binary-searched” across the decimals until my Excel grid told me that as long as double-precision goes (15 significant numbers), I have ≈ 1 as the sum. I ended up with the following numbers :

  • 17-tap : 1.2086
  • 15-tap : 1.1402108
  • 13-tap : 1.067359295
  • 11-tap : 0.9890249035
  • 9-tap : 0.90372907227
  • 7-tap : 0.809171316279
  • 5-tap : 0.7013915463849

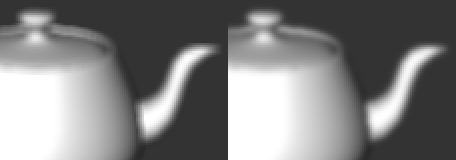
17-taps per pass, so basically 289 effective texture samples (actually 34…), and a standard deviation of 1.2?! This is what it looks like, original on right, blurred on left :


So my first thought was, “This can’t be right.”

Good Enough

In my first demo, I used a σ = 2.7 for 9 taps, and it didn’t look that bad.
So this got me thinking, how “boxy” can the Gaussian become for it to still look believable? Or, differently put, how much light can we lose before getting a Box-like filter?

To determine that, I needed a metric, a scale. I decided to use the Mean Difference, a.k.a. Average Deviation.
A Box filter does not vary, it’s constant, so its mean difference is always 0. By calculating how low my Gaussian approximations’ mean difference goes, one can find how similar it really is to a Box filter.

The upper limit (0% box-filter-similarity) would be the mean difference of a filter that loses no light at all, and the lower limit (100% similarity) would be equal to a box filter at (again) 15 significant decimal numbers.

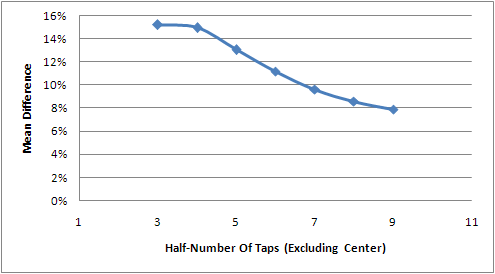
So I fired up Excel and made those calculations. It turns out that at 0% lost light, the mean difference is not linear with the number of taps. In fact, the shape highly resembles a bell curve :

I fitted this curve to a 4th order polynomial (which seemed to fit best in the graph) and at most, I got a 0.74% similarity for 0% lost light, in a 9-tap filter. I’m not looking for something perfect since this metric will be used for visual comparison; the whole process is highly subjective.

Eye Exam

Time to test an implementation and determine how much similarity is too much to this blogger’s eye.
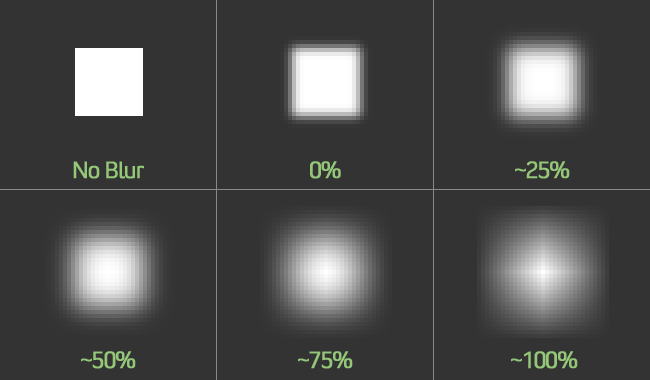
Here’s a fairly tiny 17×17 white square on a dark grey background, blurred with a 17-tap filter of varying σ and blown up 4 times with nearest-neighbour interpolation :

The percentage is my “box-likeness” or “box filter similarity” calculation described in the last section.

Up to 50%, I’m quite pleased with the results. The blurred halo feels very round and neat, with no box limit that cuts off the values harshly. But at 75%, it starts to look seriously boxy. In fact, anything bigger than 60% visibly cuts the blur off. And at 100%, it definitely doesn’t look like a Gaussian, more like a star with a boxy, diamond-shaped blur.

Here’s how 60% and 100% respectively look at a 9-tap, for comparison :

50% looks a liiiiiitle bit rounder, but 60% is still very acceptable and provide a nice blurring capability boost.

Conclusion

My conclusion, like my analysis, is extremely subjective…
I recommend not using more than 60% box-similarity (as calculated with my approach) to keep a good-looking Gaussian blur, and not more than 50% if your scene has very sharp contrasts/angles and you want optimal image quality.

The ideal case of 0% lost light is numerically perfect, but really unpractical in the real world. It feels like a waste of GPU cycles, and I don’t see any reason to limit ourselves to such low σ values.

Here’s a list of 50% and 60% standard deviations for all the tap counts that I consider practical for real-time shaders :

  • 17-tap : 3.66 – 4.95
  • 15-tap : 2.85 – 3.34
  • 13-tap : 2.49 – 2.95
  • 11-tap : 2.18 – 2.54
  • 9-tap : 1.8 – 2.12
  • 7-tap : 1.55 – 1.78
  • 5-tap : 1.35 – 1.54

And last but not least, the Excel document (made with 2007 but saved as 2003 format) that I used to make this article : Gaussian Blur.xls

I hope you’ll find this useful! Me, I think I’m done with the Gaussian. :D

Gaussian Blur Revisited, part one

Second part can be found here.
An implementation of the concepts presented in this series can be found here.

A long time ago, in a blog not so far away, I studied how the Gaussian distribution worked to implement a Gaussian Blur HLSL shader. That worked pretty well, I learned a lot of stuff, and managed to make a very functional shader. But some problems were overlooked and fixed with not-so-scientific solutions/hacks. Last week and this week, I spent more time thinking and experimenting with Gaussian blur weights, and discovered some pretty interesting stuff.

Losing Light

The first problem that I mention in my original post is the fact that when passing any image through a Gaussian blur shader darkens it, a certain portion of brightness or “light” is lost in the process.
Usually, the Gaussian function (a.k.a. the bell curve or normal distribution) has an integral between from x = -∞ to +∞ of exactly 1. But when you sample it at discrete intervals, you always lose a certain portion of that full integral.
To prevent this effect, I decided to “normalize” all the weights (a weight being a sample of the G(x) function at some x distance) to have a sum of exactly one, since that’s what I want to end up with anyway. This works, and my filtered images are bright again.
But doing so has a subtle yet perverse effect to it.

Boxing the Gaussian

Let’s take a 5-tap uni-dimensional kernel with a standard deviation of σ = 1. As a reminder, the standard deviation defines how wide the function is, and how much blurring is performed, and the “tap” count is the number of texture samples done in a single pass (each pass being either horizontal or vertical).
Here are the weights acquired from the function, then the normalized weights (since the function is reflective at x = 0, I only show values for [0, 2]) :

0.39894228, 0.241970725, 0.053990967
Σ = 0.990865662

0.402619947, 0.244201342, 0.054488685
Σ = 1

That looks quite fine. Now let’s use a wider σ of 5.

0.079788456, 0.078208539, 0.073654028
Σ = 0.38351359

0.208045968, 0.203926382, 0.192050634
Σ = 1

Notice how the normalized weights are very close to each other. In fact, it highly resembles an averaging 5-tap Box filter :

0.2, 0.2, 0.2
Σ = 1

When you think about it’s it very natural for this effect to occur. The bigger the standard deviation, the closer to the curve’s apex you sample values, and the lower the apex as well. So the difference between the samples is smaller and you go closer to a straight line.
In fact, at σ = ∞, any normalized Gaussian kernel becomes a Box filter. I don’t have a formal proof for that, but it’s clearly visible, and with single-precision floats it takes a lot less than the infinity.

Visual Difference

Now why is it so bad to use a box filter? It’s as wide as our kernel can get with its limited number of taps after all…

Here’s a visual comparison of the same scene under a 5-tap Box filter and a Gaussian with σ ≈ 1.5, giving it about the same span. It’s not an apples-to-apples comparison, but it should give you an idea.

Comparison shot 1

Comparison shot 2

A Box filter is quite unlike a Gaussian blur. Sharp edges get blocky and it gives a more “sharp” feel than the Gaussian. So it’s definitely not optimal.

Ye Olde Cliffhanger

Getting late here, so I’ll wrap this up.
The question left is this one : At which standard deviation does our Gaussian sampling lose 0% brightness/light for a fixed number of taps? Is that even possible?
Why, yes, yes it is. I’ll keep this for part two!

Hash tables and mutable keys, final

I am really, really sick of seeing the preceding post and its cliffhanger on my blog’s front page, so here’s an abrupt end to it.

There is no sample/code, there won’t be any sample. But I do have one conclusion : If your algorithm needs a hash table with mutable keys, then don’t mutate their hash code.

There is absolutely no good reason for a hash set to have keys that get lost, and no point in hacking the data structure to trace all those swaps and recover from them.

Why do I say this after two lengthy posts about how to circumvent the problem? Simple. A hash set should be, first and foremost, a set. And sets are built upon the idea that all its elements are unique and there are no possible duplicates. But if an element can mutate enough to modify what uniquely identifies it, the operation potentially breaks this assumption. How can you know if your set has unique elements if the elements keep changing, and you can’t keep them from changing?

This leads me to the inevitable (yet predictable) conclusion that mutating keys is not a good idea. In my tests and situations, and I’ve tried for weeks to find a test case where sets mutable keys are absolutely needed, there is always a way around it, and it’s safer, it makes more sense.

So next time you see exceptions or problems of that nature (e.g. unreachable elements), think for a minute. Do you really need mutable keys? You probably don’t, but what if you do? Just don’t override GetHashCode() and move to something else.

There, problem solved. Moving on. :)